My sewing basket used to be a chaotic tumble of colors and scraps until I started treating that pile as a playground. Scrap Fabric Stash Busting Crafts became a little ritual for quiet evenings, a way to turn odd bits of cotton and denim into small, useful things that made me smile.
I enjoy the odd texture against my fingers and the surprise when two clashing prints actually get along. This topic nudged me toward projects that feel cozy and practical without asking for a big commitment.
Patchwork coasters with mismatched charm and color

There is something reassuring about a stack of tiny, mismatched coasters sitting by the kettle. I love how frayed edges peek out and a scatter of visible stitches gives each piece personality.
The fabric mix creates a little collage where soft cotton meets a sturdier denim scrap, and the weight of a mug leaves a faint impression that seems to say this was made for everyday life. Colors that would never meet on their own end up chatting, and shelf-worn linens add a faint, homely scent to the set.
Steps
- Gather small fabric scraps, a bit of batting, matching thread, and a straight stitch machine or needle.
- Cut paired squares from scraps and batting to slightly different sizes for a layered look.
- Sew the fabric squares together in a patchwork arrangement and topstitch around the edges to secure layers.
- Trim seams and press the finished coaster flat for an even, finished appearance.
Braided rag rug that soaks up kitchen mornings

A braided rag rug has that quiet, lived-in atmosphere I crave under bare feet while making coffee. The braids gather colors into gentle waves and small defects become character marks.
Heavier cotton and linen scraps create a pleasantly squishy surface and a subtle rustle when someone walks across it. I remember the first time I stepped down onto one and felt the warmth of layered fabric rather than cold floor.
The rug ages gracefully, the palette mellowing, and the smell of laundered cloth carries hints of the seasons.
Steps
- Collect long strips from wider scrap fabric pieces and arrange them by color and weight.
- Braid sets of three strips tightly, then sew the braid along its length to hold tension.
- Coil the braided rope into the desired rug shape and stitch the inner edge as you go to secure.
- Finish by tucking and stitching the tail ends under the outer edge for a neat look.
Quilted placemats that brighten late breakfasts

Quilted placemats feel like a small, reliable indulgence during slow mornings. Patchwork squares gather morning light in little color windows and quilting lines add a soft ridged texture under a breakfast bowl.
Fabrics from shirts, old curtains, and odd pillowcases sit next to thrifted florals and bold geometrics, each square holding a memory. The seams create a faint tactile grid and the binding frames the piece like a tiny canvas.
When plates meet the fabric there is a quiet satisfaction in the slight muffled clink and the familiar warmth beneath hands.
Steps
- Sort fabric scraps into coordinating color families and trim to uniform rectangles for the placemat layout.
- Sew the patchwork top together in rows and press seams flat for an even surface.
- Layer the patchwork top with batting and a backing fabric, then quilt lines across the whole placemat.
- Attach binding around the edges and finish with neat topstitching for a tidy frame.
Scrappy fabric bowl for keys and small treasures

A fabric bowl perched by the door becomes an accidental ritual keeper of coins and stray buttons. Its soft walls cradle small things gently, and the interior absorbs little smells of the room until it holds scents of pockets and daily life.
I like the weightless feel compared with ceramic bowls, and the slightly uneven rim makes each bowl feel handcrafted and homey. Contrasting prints inside and out create a tiny surprise when hands reach in, and faint sewing marks act like fingerprints, telling a story of patience and small fixes.
Steps
- Cut concentric strips from heavier scrap fabrics and baste them together to form a stackable coil.
- Sew the fabric coil by machine or hand, spiraling outward to build wall height and bowl shape.
- Shape the coil gently as stitching continues so the bowl acquires a tidy curve.
- Finish the rim with a folded fabric edge or narrow binding for a clean top.
Fabric scrap garland that lifts a room’s mood

A garland of fabric ribbons lightens a corner in a way that paper decorations rarely do. Strips of cotton and voile flutter slightly in the air and the texture catches light differently across each piece.
Some ribbons smell faintly of the soap used last time they were washed, which feels comforting. The rhythm of repeating colors and prints along the string creates a casual kind of order that suits a kitchen nook or a sleepy bedroom.
When a guest notices it, the conversation often drifts to where each scrap came from.
Steps
- Select long fabric strips from lightweight scraps and arrange a pleasing color rhythm.
- Knot or loop each strip around a cord or ribbon, spacing them evenly along its length.
- Secure the ends of the cord to prevent slipping and adjust ribbon positions for balanced coverage.
- Hang the garland at a gentle curve and let the ribbons sway naturally for a relaxed effect.
Patchwork tote that carries weekly market finds

A patchwork tote gains personality with every errand run, the surface telling stories of fabrics collected over years. Heavier canvas panels from old bags sit next to soft dress cottons, creating a layered feel when hands brush the outside.
The weight of produce presses tiny creases into seams and the tote changes shape in a pleasing, casual way. Handles soften where shoulders have rested and the interior sometimes preserves a faint scent of herbs or citrus.
I enjoy how each patch acts like a miniature map of projects and moments.
Steps
- Lay out larger scrap panels to form the tote body and arrange them into a balanced patchwork.
- Stitch the panels together and reinforce bottom seams for added strength and structure.
- Create and attach handles from sturdier fabric or layered scraps, securing with box stitches.
- Finish the top edge with a folded lining and topstitch to hide raw seams.
Zipper pouches that finally tame my drawer chaos

Zipper pouches make the drawer feel civilized, even if each one is a little different. Soft fabrics create a pleasant give when fingers dig in for a pen or charger, and a bright lining fabric can be a small, cheerful surprise.
The metal zipper adds a cool contrast to warm cotton and the act of sliding it closed has a discreet, satisfying sound. I keep an ancient thimble in one and a stack of hair ties in another; their colors help me remember what’s inside without searching too hard.
Steps
- Select outer and lining scrap fabrics and cut rectangles to the desired pouch size.
- Place zipper between outer and lining pieces and stitch in place along the top edge.
- Sew the bag sides and bottom with right sides together, leaving a small opening in the lining for turning.
- Turn the pouch right side out through the lining opening, press flat, and close the opening with hand stitching.
Simple scrunchies that revive old fabric scraps

Scrunchies are one of those tiny pleasures that brighten a wrist or ponytail. The gathered fabric creates soft ruffles that move with the hair and catch light differently as they shift.
Thin silk scraps drape like clouds, while thicker cotton gives a firmer, retro bounce. They can also carry memories: a strip from a well-loved shirt wraps around a morning routine and feels like a small anchor.
When stacked on a jar or a wrist, the assortment becomes unexpectedly decorative, offering color pops without demanding attention.
Steps
- Cut long narrow fabric strips and prepare elastic to the suitable length for a hair tie.
- Fold or roll the fabric into a tube and stitch along the long edge to form a casing.
- Thread the elastic through the casing, knot the elastic securely, and adjust gathers evenly.
- Close the casing seam neatly by hand or machine to conceal the elastic ends.
Fabric beads necklace with vintage flair and texture

A necklace made of wrapped fabric beads feels unexpectedly light around the neck and has a tactile warmth that metal lacks. Each bead bulges with scraps, creating a soft, squashy rhythm against skin.
Tiny floral prints nestle against bold geometrics, producing curious little conversations along the strand. The stringing rhythm becomes calming while making them, and the finished necklace has an approachable, handmade look that invites compliments.
When worn, it softens sharper outfits and acts like a tiny portable collage of memories that can be worn close.
Steps
- Cut strips of fabric and wrap them around lightweight bead cores or tightly wadded fabric forms.
- Secure each wrapped bead with discreet stitches or fabric glue and allow to dry if adhesive is used.
- Thread the finished beads onto a cord or chain, spacing them to taste for a balanced composition.
- Finish the ends of the cord with sturdy knots or metal findings for reliable closure.
Stuffed sachets filled with calming dried herbs

Sachets stitched from leftover fabric add gentle scent pockets in drawers and closets. I like the contrast between a crisp linen exterior and the softness of lavender inside, which releases a quiet, herbal breath when the cloth is pressed.
The tiny quilts or appliqué motifs on the sachet surfaces make them feel like miniature keepsakes. Placing one between folded linens brings a faint, fresh note to the pile, and old-fashioned patterns contribute a comforting, domestic warmth.
Each sachet seems to hold a small intention of care for the things around it.
Steps
- Cut small rectangles of scrap fabric and prepare a pouch shape by folding with right sides together.
- Sew around the edges leaving a small opening, then turn the pouch right side out.
- Fill the pouch with dried herbs or scented fillings and hand-stitch the opening closed.
- Add decorative topstitching or a tiny applique if desired for a finished look.
Denim pocket organizer repurposed from old jeans

Repurposed denim pockets create an honest, utilitarian organizer with rugged texture. The heavy denim panels and rivet marks bring a casual sturdiness while the pockets themselves offer little rooms for stray tools and pens.
I enjoy the contrast between the worn, softened seat of the jeans and the crisp new stitching that gives it new purpose. When mounted on a wall, the organizer has a friendly, slightly industrial look and the faded blues and indigoes reflect light in subtle ways.
It becomes an easy place to stash often-used small items.
Steps
- Cut out pocket sections from old jeans, preserving seams and rivets where possible.
- Arrange pockets on a sturdy backing fabric or board and pin them in a pleasing layout.
- Sew pockets onto the backing securely with reinforced stitching at stress points.
- Add hanging hardware to the backing and place the organizer in a useful spot.
Appliqué tea towels with cheerful fabric patches

Appliqué on a tea towel adds a slice of personality to kitchen chores that are otherwise functional. Soft cotton scraps layered into shapes become little bright islands on an otherwise plain background, and the edges of the appliqué gather tiny shadows that change as light shifts.
The towel fabric itself takes on a lived quality over time, softening and thinning in places where hands wipe plates. I like how the appliqué allows a small flourish without demanding perfection, and how each patch can nod to a remembered dress or curtain that inspired it.
Steps
- Choose towel base and cut appliqué shapes from scrap fabric, arranging them into a pleasing composition.
- Pin or baste the shapes onto the towel and stitch around the edges with a tight stitch.
- Remove any basting and press the towel gently to settle seams.
- Wash and dry the towel to let the appliqué relax into the fabric for a finished look.
Fabric bookmarks that make reading feel homier

A handmade fabric bookmark fits a book like a gentle nudge rather than a wedge. Thin scraps of linen or cotton with a soft stabilizer keep the marker slim while offering a pleasant tactile contrast to paper.
Some bookmarks carry tiny embroidered initials or a bead at the end that ticks softly when the book shifts. Holding a bookmark made from a favorite dress or curtain can feel oddly comforting, like the story and the fabric are quietly linked.
They slip between pages without bulk and seem to age alongside the book’s spine.
Steps
- Cut narrow rectangles from scrap fabrics and add a lightweight interfacing for stability.
- Fold and stitch long edges to create a neat finished tube or flat panel.
- Add decorative stitching, embroidery, or a small tassel at one end for personality.
- Press the bookmark flat and trim any loose threads for a tidy finish.
Plush cat toys stitched from colorful scrap pieces

Small fabric toys made from scraps become instant favorites for playful pets. The combination of soft cotton and a little stuffing produces a satisfying bounce that invites batting and pouncing.
Fabrics with different weaves give the toy varied textures while a loose jingle inside creates a teasing chime. I often hide one under a chair and watch the joyful surprise when a cat rediscovers it, eyes bright and paws ready.
Worn edges and a few mismatched stitches only prove the toy’s well-loved status and add to the household energy.
Steps
- Draw a simple toy shape on scrap fabric and cut matching pieces for front and back.
- Sew the edges with right sides together, leaving a small opening for stuffing.
- Insert stuffing and a small bell if desired, then stitch the opening closed securely.
- Reinforce seams with extra stitching to withstand playful attention.
Fabric postcards carrying tiny stitched stories

Fabric postcards feel like a letter folded into texture, pleasant to hold and less formal than paper. Small embroidered motifs, vintage lace trims, and layered scraps come together like tiny stage sets.
The postcard’s edge often shows a neat zigzag stitch that gives it a finished, tactile boundary, and the choice of backing fabric changes how the piece bends in the hand. Mailing one feels like sending a pocket of warmth, and when one arrived for me long ago, the thrill was equal parts fabric and message.
They make correspondence unexpectedly personal.
Steps
- Cut postcard-sized rectangles from scrap fabric and back them with sturdy fabric or interfacing.
- Arrange small appliqué shapes and decorative stitching on the front panel.
- Stitch around the edges with a zigzag or decorative stitch to secure layers.
- Add a backing fabric and hand-write the message on a small attached card if mailing.
Mini pincushions that keep tiny pins safe and handy

A little pincushion made from fabric scraps becomes an indispensable workmate on the sewing table. The compact, plump form resists pins with a forgiving spring and a faint scent of fabric carries from nearby projects.
Patchwork tops let bright prints peek through, and a small button or stitched flower at the center makes each one distinct. I like arranging several in a bowl so they become a colorful cluster that catches stray light.
They sit there, patiently waiting, and slipping a pin into one feels almost meditative.
Steps
- Cut two fabric circles or shapes and sew them together with right sides facing, leaving a small opening.
- Turn the piece right side out and fill with pincushion stuffing or crushed walnut shells for weight.
- Close the opening with ladder stitch and add a central tuft or decorative button if desired.
- Tidy any loose threads and press lightly for a neat finish.
Fabric-covered buttons that tie projects together
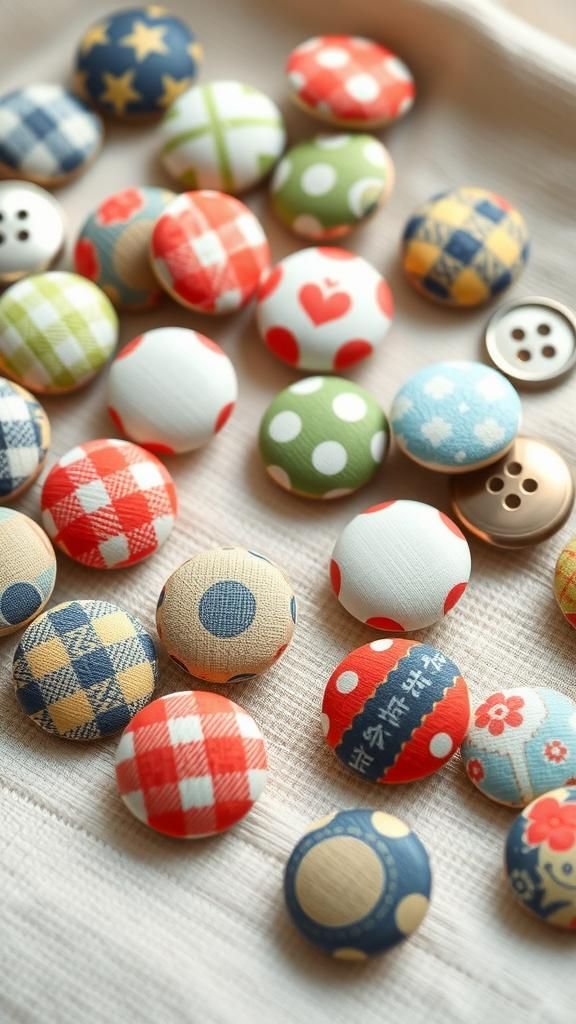
Fabric-covered buttons are like tiny signatures on garments and accessories, carrying patterns in miniature. The smooth domes show a concentrated snapshot of a larger print and the soft edges catch light in a gentle halo.
Buttons made from scraps can match or deliberately contrast the fabric they sit on, producing a small, deliberate discord that feels playful. I remember smoothing a tiny floral over a metal base and watching the pattern line up like a little puzzle.
They make handmade gifts feel thoughtfully finished and invite a closer look.
Steps
- Select small fabric scraps with attractive pattern sections and trim circles slightly larger than button molds.
- Place fabric over button forms and press or snap the backing into place according to the button kit.
- Trim any excess fabric neatly around the back and secure with a dab of fabric glue if needed.
- Sew the covered button onto garments or accessories with sturdy thread for a long-lasting finish.
Upcycled fabric napkin rings for casual dinner charm

Napkin rings crafted from scraps give a dinner table a low-key, handmade presence. Twisted strips or small rolled roses of fabric create tiny sculptural details that rest against folded napkins and feel pleasant to touch.
Natural fibers lend a subtle, earthy warmth while shiny prints introduce a splash of evening cheer. When guests reach for a napkin, there is often a small compliment about the color or texture, which feels like an ordinary kind of hospitality.
The rings sit unobtrusively but help the table look thought-through without fuss.
Steps
- Form rings by wrapping fabric strips around sturdy ring bases or shaping padded tubes.
- Secure the fabric ends with neat stitching or discreet adhesive suitable for fabric.
- Add decorative elements like small fabric flowers or stitched accents if desired.
- Arrange the rings around cloth napkins for a welcoming table presentation.
Small drawstring bags for tidy little collections

Drawstring bags born from scraps are endlessly useful for storing seeds, jewelry, or tiny odds and ends. Their soft walls make them suitable for delicate things and the gathered top produces a satisfying silhouette when closed.
Natural fibers create a reassuring friction so the drawstring rests where placed, and a tiny embroidered label can help identify the contents without fuss. I like slipping handfuls of lavender-filled bags into drawers or giving them as small, thoughtful containers for little gifts.
They feel humble and practical, yet quietly considered.
Steps
- Cut matching fabric rectangles and sew the side seams to form a simple pouch shape.
- Fold and stitch a narrow casing at the top edge for the drawstring channel.
- Thread a cord or narrow fabric strip through the casing and knot the ends to secure.
- Tighten the drawstring to close the bag and tuck or finish loose ends neatly.
Fabric wall art patchwork frames for soft color studies

A patchwork panel framed on the wall reads like a color study that also feels tactile. Small swatches arranged in gradients or playful clusters invite the eye to travel across stitches and seams.
The padded surface gives the piece a gentle relief and a closer look reveals tiny hand or machine marks that narrate the making. I hung one above my desk and it shifted the room’s tone, offering quiet color cues rather than loud decor.
The tactile quality encourages a hand to rest near it sometimes, enjoying the soft surface and tiny imperfections.
Steps
- Create a patchwork panel from scrap fabrics and mount it onto a firm backing for stability.
- Add batting beneath the patchwork if a padded look is desired, then quilt or tack layers in place.
- Trim the panel to fit a chosen frame size and secure the fabric edges on the backing.
- Frame the piece with a shallow shadowbox or simple frame and hang at eye level.
Cozy microwave heating pad stuffed with rice and scraps

A microwave heating pad sewn from scraps offers a comforting, slow warmth that settles against shoulders or a lower back. The soft fabric exterior gives a gentle friction while the warm interior releases a tender scent of cloth and whatever herb blend might be tucked inside.
I like the way the pad retains heat just long enough for a quiet reading moment but never feels too hot. The patchwork surface can be an unplanned mosaic of leftover pieces, and the weight of the rice filling makes it feel like a warm, steady companion on chilly evenings.
Steps
- Sew two layers of scrap fabric together with a channel pattern for filling compartments.
- Leave a small opening to pour in dried rice or another dry grain and a few drops of essential oil if desired.
- Fill the pad, distribute filling into compartments evenly, and stitch the opening closed securely.
- Heat the pad briefly in a microwave following safe heating guidelines and test temperature before use.