I still remember the glow of last New Year’s Eve when a cluster of homemade decorations turned the living room into something warm and a little bit bright. I kept reaching for the little details that felt personal and slightly cheeky, which is what drew me into making New Year’s Eve Party Decor Crafts over the years.
Making New Year’s Eve Party Decor Crafts has become a small ritual.
There’s pleasure in the textures and the sounds, from metallic fringe that shivers in the air to the soft clink of tiny orbs, and those moments are what I like to recreate for friends.
Foil-wrapped champagne labels with textured sparkle

I loved how these labels transformed ordinary bottles into tabletop focal points. The foil catches the light when people raise their glasses, sending warm flashes across the room.
The texture under fingertips is pleasantly crisp, like a whisper of metallic paper that promises a festive night. Colors ranged from rose gold to bright silver and a darker pewter that felt grown-up.
I remember moving a bottle and watching subtle reflections trace the ceiling, a small theatrical moment that made conversation slow for a beat.
Steps
- Lay a sheet of foil paper flat and snip a band slightly wider than the bottle circumference.
- Gently wrap the band around the bottle neck area and secure the edge with a small strip of double-sided tape or a dab of adhesive.
- Add a thin paper circle for a front label and adhere a metallic sticker or embossed numeral to the center.
- Smooth the foil so it sits snugly and tuck any extra at the underside to keep the view tidy.
Confetti-filled clear balloons that shimmer at night?
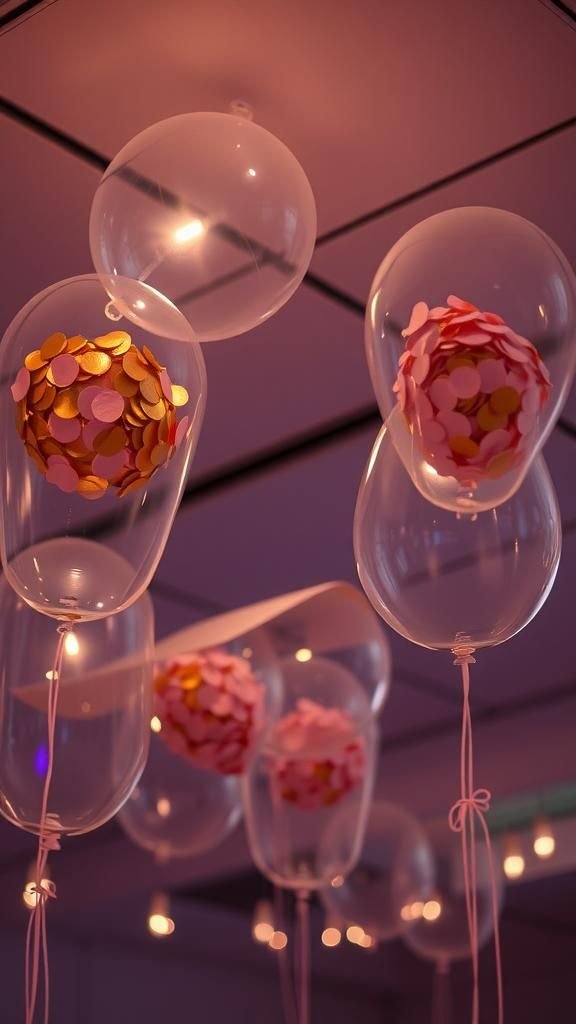
There was a silly thrill in watching these bob gently near the ceiling, confetti catching tiny beams from string lights. The clear surface felt almost glassy under fingertips, and the confetti inside created a moonlike speckled sky.
I loved the variety of confetti textures—some crisp metallic shards, others soft tissue circles that fluttered when the balloons nudged each other. Placing them near lamps made the confetti glow like stars, and watching guests smile up at them became a favorite moment.
Steps
- Inflate a clear balloon slightly and add a handful of metallic and tissue confetti through the neck.
- Top the balloon with helium until it holds a gentle upward pull and tie the neck with a thin ribbon.
- Secure a small weight to the ribbon end so the balloon floats at the desired height.
- Place the balloons near soft lighting so confetti catches and reflects light.
Layered tassel garland in metallic tones and texture

I remember the way a layered tassel garland added movement across a mantle, each tassel whispering when someone walked past. The mix of crinkly metallic fringe and soft tissue created a friendly contrast, almost like pairing a crisp jacket with a cozy sweater.
The palette leaned toward cool silver, warm champagne, and a muted rose that felt modern. When the room dimmed a little, the tassels shimmered and gave a gentle rustle that seemed to mark the hour without shouting.
Steps
- Prepare strips of metallic fringe and tissue in staggered lengths and bunch similar shades together.
- Align a cluster and loop a thin cord around their tops to form a single tassel unit, securing the cord with a tight knot.
- Repeat to create multiple tassels and slide them along a thicker twine or ribbon to form a garland.
- Space the tassels evenly by sliding them along the support cord until the rhythm feels balanced.
Mirrored fringe photo booth backdrop for playful portraits

This backdrop turned a blank wall into something instantly celebratory. The mirrored strands caught every flash and bounced light in playful shards that made faces glow.
The sound of the fringe moving created a faint tinkle, like a distant chime, and I liked how different angles produced surprising glints of color. People tended to cluster in front of it, laughing as reflections multiplied.
Even in low light the backdrop read clearly, offering a shimmering field for casual photos and a theatrical sense of arrival.
Steps
- Hang a sturdy rod or tape line horizontally at the desired backdrop height.
- Drape strips of mirrored fringe along the rod, allowing each piece to overlap slightly for fullness.
- Secure the top edge of each strip with a discreet adhesive or small clips to keep them aligned.
- Position soft uplighting or string lights to enhance reflections and depth.
Low centerpiece with stacked metallic orbs and glow

I grew fond of a low centerpiece that felt elegant without getting in the way of conversation. Stacked metallic orbs of different diameters sat on a soft base of velvet or matte fabric, their surfaces catching candlelight and reflecting tabletop tones.
The cool touch of metal contrasted with warm shadows, and the gentle gleam made the spread feel quieter but lively. It created a tactile point of interest that invited a closer look rather than shouting at the room.
Steps
- Arrange a soft fabric base on the table to define a small zone for the centerpiece.
- Place a larger metallic orb first, then balance smaller orbs beside and slightly on top until the composition feels harmonious.
- Nestle a few tealight holders or battery lights around the orbs to add a gentle inner glow.
- Tuck a sprig of greenery or a thin metallic ribbon beneath an orb to introduce subtle contrast.
Countdown hourglass centerpieces with glowing sand

There was a quiet charm in tiny hourglasses as centerpieces, each one holding sand that shimmered like ground metal. Watching the sand fall felt oddly meditative, a small way to feel the passage of time without fanfare.
The glass had a crisp clarity and the sand made a faint whisper when the hourglass moved. Paired with soft lights the sand’s metallic sheen picked up warm tones, and guests liked turning them over gently, a tactile countdown that felt intimate.
Steps
- Select small hourglasses and sprinkle a tiny amount of metallic or pearlescent sand into the top chamber.
- Close the hourglass opening with a small cork or cap that fits snugly and keeps the sand contained.
- Place the hourglass on a small soft coaster or mirror tile to reflect light beneath it.
- Add a battery tealight nearby to enhance the shimmer and make the sand glow.
Mason jar lanterns with fairy lights and brass accents

Mason jars can feel downright cozy when they hold a cluster of tiny lights, and the addition of a brass rim or tag adds a touch of polish. I liked the way the glass softened the light into a honeyed glow, and the metallic accent provided a crisp edge that offset the jar’s homely charm.
The jars hummed with a gentle warmth, both visual and tactile, and lining them down a staircase or along a buffet created a friendly procession of light that guided people through the space.
Steps
- Coil a short string of battery fairy lights and place them inside a clear mason jar.
- Close the lid and fit a decorative brass rim or slide a thin metallic band around the neck for contrast.
- Add a small tag hanging from the rim for a date or brief message if desired.
- Arrange jars in groups along routes or at different heights to create pathways of warm light.
Embossed metallic napkin rings with the year highlighted
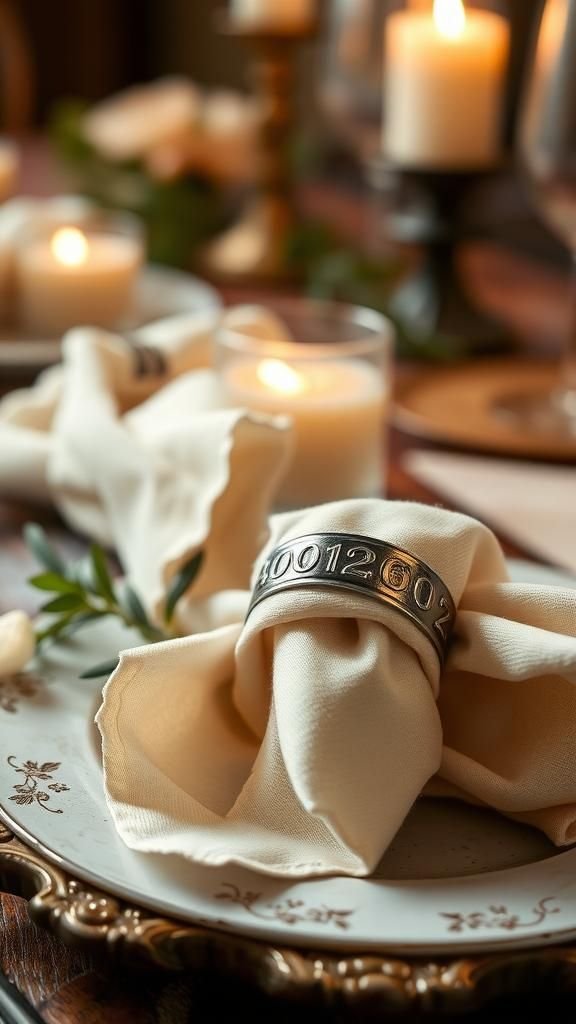
Napkin rings embossed with a year or subtle motif gave each place setting a small celebratory wink. The metal had a quiet weight and the embossed pattern invited a fingertip to trace the texture.
I appreciated how they framed a folded napkin without overpowering the plate, adding a little sound as cutlery moved nearby. When clustered after dinner they made for a tidy group of keepsakes that felt like miniature trophies for the night.
Steps
- Select thin metallic rings or bands that slip comfortably over napkins.
- Impress a year or motif into the metal using an embossing tool or metal punch.
- Buff the raised areas lightly so highlights catch the candlelight.
- Slide the rings onto cloth napkins and place them atop each plate for a cohesive table look.
Sequined cone party hats with velvet trim and charm

Those cone hats felt playful without being childish when sequins met a velvet trim. The sequin surface caught every stray light and flashed in small, lively patches as people moved.
The velvet edge softened the look and added a little weight so the hat sat comfortably. I remember the sound of sequins brushing against each other, like subdued tinsel, and how the hats made even shy guests grin.
They read as celebratory accessories that could be kept as whimsical mementos afterward.
Steps
- Form a cone shape from a heavy sequin fabric or paper and align the seam edges neatly.
- Secure the seam with a thin line of adhesive tape or an internal strip to maintain shape.
- Add a soft velvet band around the base to create a comfortable rim.
- Affix an elastic cord inside the base so the hat sits snugly when worn.
Beaded shaker noisemakers with playful metallic finishes

There was a charming clatter when these noisemakers moved, beads hitting metal in a small celebratory rhythm. I liked the mix of tactile elements: cool metal shells, warm wood handles, and tiny beads that slid like rain.
The finishes ranged from brushed copper to bright chrome, and holding one felt satisfying, like a handheld percussion instrument. It created a communal sound that felt joyful rather than overwhelming, and that shared rustle of bead on metal quickly became part of the evening’s soundtrack.
Steps
- Gather a small metal tin or cylinder and pour a modest handful of tiny beads or sequins inside.
- Fit a wooden handle into the tin’s end and secure the connection with a snug wrap of tape or cord.
- Close the open end with a tight-fitting lid or cap to keep beads contained.
- Decorate the exterior with metallic washi tape or small stickers for a finished look.
Confetti popper tubes with tissue and glitter bursts

Those popper tubes made the moment of midnight feel slightly cinematic. The crisp sound when they opened mixed with a soft scatter of tissue and glitter that spun in the air before settling into pockets of shimmer.
The tubes had a pleasant weight and the tissue inside offered a fluttering softness against metallic sparkles. Guests enjoyed the brief burst of chaos and the quiet seconds afterward when everyone laughed and brushed confetti from sleeves and hair, a sticky, shiny memory.
Steps
- Fill a sturdy paper tube with a mix of tissue confetti and lightweight metallic flakes.
- Compress the contents gently so the cap closes without too much slack.
- Seal the ends with a strip of decorative tape to keep the interior snug.
- At the chosen moment, twist or pull the cap to release a shower of confetti.
Pearlescent origami star lanterns hung in clusters
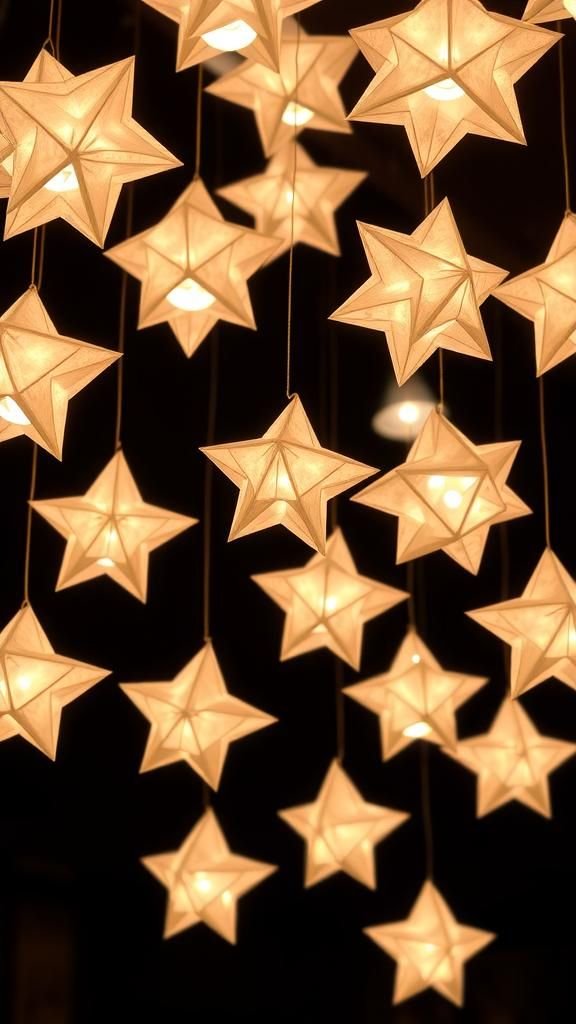
Folding those stars felt quietly absorbing, and the finished lanterns gave a soft, pearly glow when lit from within. Their edges cast delicate shadows while the pearlescent paper reflected a cool sheen that shifted with angle.
Clustered in groups they created a constellation of small lights, each star hung at a slightly different height to suggest depth. I liked the hush they brought to the ceiling, a gentle overhead presence that read as both handmade and thoughtfully elegant.
Steps
- Fold pearlescent paper into three-dimensional star shapes following a simple template.
- Insert a small battery light into the center cavity of each star, ensuring the light sits securely.
- Thread a fine cord through a top loop and knot it for hanging.
- Suspend the stars at staggered heights to form a soft cluster above the party area.
Mixed-texture streamer curtain doorway with layered shine

Walking through a streamer curtain added a playful moment of transition between rooms. The curtain merged crinkly metallic strips with softer tissue panels so the entrance felt lively to pass through.
There was a light touch against clothing and a faint, musical rustle as people moved. The layered shine offered a depth that changed as folks threaded through, sometimes revealing glimpses of the room beyond in slivers of reflected light.
It made arrival feel like stepping into a small suspended world.
Steps
- Secure a horizontal hanging line across the doorway at a comfortable height.
- Prepare alternating strips of metallic fringe and soft tissue and hang them so they overlap slightly.
- Fasten the top edges with clips or tape, ensuring an even rhythm across the width.
- Allow the strips to hang freely so they move and catch the light as people pass.
Oversized glitter numerals for a photo-ready display

Large numerals coated in fine glitter made a bold but friendly photo prop that anchored the room. Their edges carried a little sparkle dust that kissed fingertips, and the surface reflected overhead lights in diffused glints.
They felt a bit theatrical but in a welcoming way, as though the numbers themselves were part of the celebration. People liked leaning against them for snapshots, and the numerals provided a clear visual marker for memory-making that read energetic without shouting.
Steps
- Trace large numeral shapes onto sturdy board and outline the edges clearly.
- Cover the front surface with an adhesive layer and press fine glitter into place for even coverage.
- Shake off excess glitter and brush any stray particles from edges to keep the scene neat.
- Prop the numerals upright on a stable base or lean them against a supportive backdrop for photos.
Safe sparkler holders fashioned from brass and cork

I appreciated a thoughtful sparkler holder that felt both pretty and practical. Brass fittings with a soft matte finish paired with natural cork bases created a stable perch for a sparkler and a reassuring feel in the hand when carried.
The metal caught glow briefly as sparklers flared, and the cork provided a tactile counterpoint. Lining them up on a tray made handing them out graceful, and watching the tiny sparks reflected in the brass was a quietly joyful moment.
Steps
- Fit a small brass tube upright into the center of a cork base so it stands steady.
- Insert a sparkler stem into the tube until it sits firmly and upright.
- Place several holders on a heat-resistant tray for distribution and safety.
- Keep a safe distance and a container for spent sparklers once they cool.
Layered fringe table runner in silver and rose gold
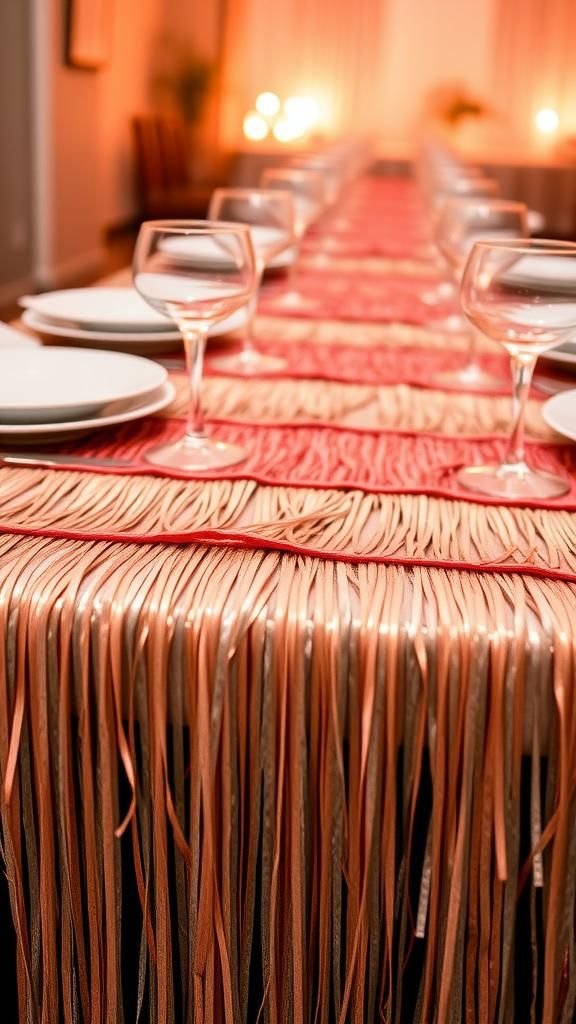
A runner built from layered fringe brought texture to a long table without overwhelming place settings. The gentle tiers of silver and rose gold created a subtle tide of shimmer that moved when plates were set down.
The fringe edges made a soft shushing sound as glasses were nudged, and the interplay of cool and warm metallics kept the color palette friendly. It read as casual glamour, the kind of detail that felt considered yet relaxed, and people seemed to lean into the softness it provided.
Steps
- Arrange alternating strips of metallic fringe along the table’s center line to form layered tiers.
- Overlap edges slightly so the fringe looks continuous and full across the length.
- Secure the fringe layers beneath with discreet tape or small clips to prevent shifting.
- Trim any stray threads from the sides for a tidy finish.
Champagne cork place card holders with tiny tags

These little holders felt like tiny trophies that also kept seating organized. The cork had a warm organic grain and a satisfying compress when touched, while the tiny tag fluttered gently on the table.
They read as quietly festive and playful, a small handmade touch that guests liked to pocket afterward. Lining them along a board made the moment of finding a seat into a little scavenger hunt, and the scent of cork added an understated sensory memory.
Steps
- Press a thin slit into the top of a used champagne cork so a small tag will slide in.
- Write each guest’s name onto a decorative tag and insert it into the slit so it stands upright.
- Arrange the cork holders along a display board or directly at each place setting.
- Offer a few extras for last-minute guests or as keepsakes.
Votive candle holders lined with metallic foil interiors

A simple votive becomes luminous when its interior is lined with metallic foil. The foil throws back candlelight in softer, warmer tones and the reflected glow feels almost liquid.
The exterior remained matte or textured, creating a contrast that made the light seem more precious. I liked how the scent of wax mingled with the metallic sheen, a cozy kind of glamour.
Grouped in clusters the holders read like a miniature skyline of light.
Steps
- Cut small circles of metallic foil to fit inside the base of a clear glass votive holder.
- Place the foil gently into the holder so it curves along the interior surface.
- Set a tealight on top of the foil and light it to observe the enhanced glow.
- Group several holders together to intensify the reflective effect across the table.
Clear glass orbs filled with confetti and tiny lights
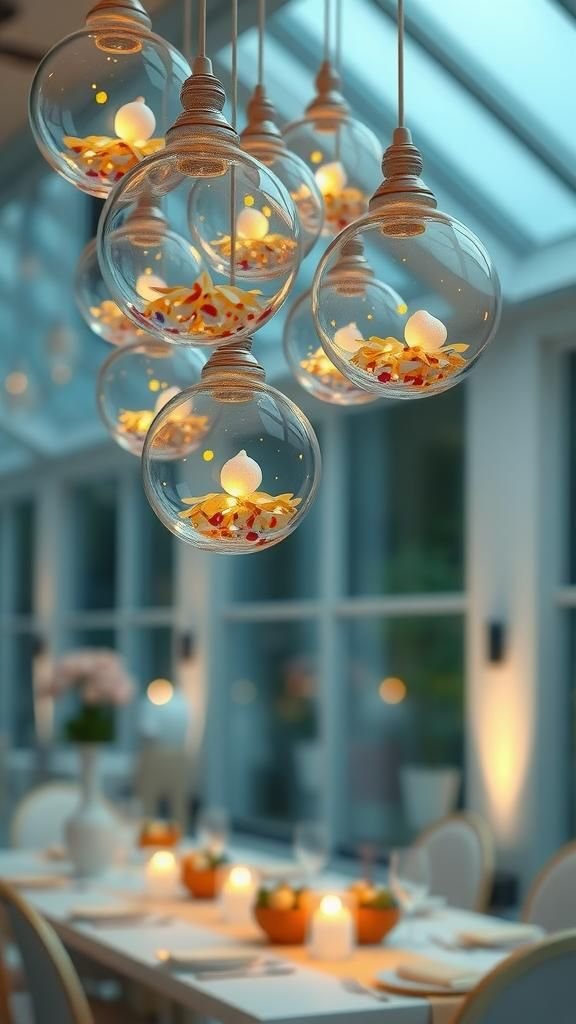
Glass orbs suspended above a table felt like captured snow globes scattered through the air. Inside, confetti drifted gently and small lights created a twinkle that played across curved glass.
The orbs had a cool surface to the touch and a delicate weight, and their shadows created soft circular pools on the table beneath. They read as whimsical and elegant at once, tiny suspended moments that made the ceiling feel inhabited by small, celebratory planets.
Steps
- Open a clear glass or plastic orb and add a small amount of confetti inside.
- Insert a tiny battery light so it nestles among the confetti and illuminates it softly.
- Close the orb securely and attach a thin cord for hanging.
- Suspend the orbs at staggered heights above the table to create a floating array.
Looped metallic straw garlands across the dessert table

Stringing metallic straws into garlands felt delightfully retro and tactile. The straws picked up light and made a crisp, slightly musical clink when moved.
Looped across a dessert table they created a playful architectural line that framed cakes and sweets. The metallic finish kept the look festive, but the simple construction kept it approachable.
It invited fingers to trace the loops and added a linear sparkle across a sugar-laden spread.
Steps
- Thread metallic straws onto a sturdy cord, alternating lengths and finishes for visual rhythm.
- Tie small knots at intervals to hold groups of straws in place.
- Drape the garland across the dessert table, adjusting loops so they sit attractively.
- Anchor the ends with small weights or tape to keep the garland steady.
Tiny cloche displays with miniature celebratory scenes

Mini glass cloches turned into little worlds: a speck of confetti, a tiny numeral, a sprig of evergreen. The glass created a hush over whatever lay beneath, making small objects feel precious.
The surfaces reflected ambient light in soft highlights and the bases offered a contrasting texture—wood, slate, or mirrored tile. Placing them along shelves or on the table created an intimate menagerie that guests liked to peer into, as if spotting delicate curiosities.
Steps
- Select small glass cloches and choose tiny decorative elements for each base.
- Arrange confetti, a miniature numeral, or a sprig of greenery within the cloche base to create a miniature scene.
- Lower the glass dome gently over the elements to preserve the arrangement.
- Group several cloches together on a tray or shelf for a curated display.