I have a habit of turning quiet afternoons into little making sessions, and Mother’s Day Handmade Gift Crafts have become my favorite way to translate gratitude into something tactile. There is a warm thrill in choosing colors, textures, and a tiny finishing touch that feels like a private joke between maker and recipient.
Over the years I have kept a stack of small prototypes and hopeful sketches labeled for future mothers, and those Mother’s Day Handmade Gift Crafts often end up being the most remembered tokens.
They carry scent, fingerprints, and a handful of inside stories.
Handwritten note in a tiny folded envelope
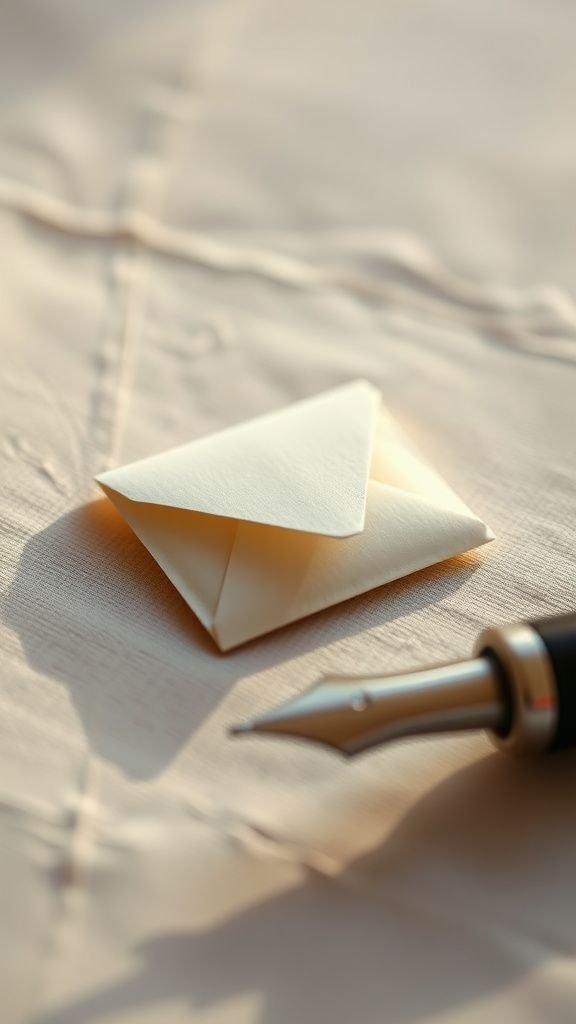
I still smile when I open a drawer and find one of these tiny folded notes, the paper soft where fingers kept it warm. The ink has a quiet permanence while the edges give a faint papery rasp when I slide it out.
The words feel intimate, almost like a breath you can hold; sometimes the pen stumbles and that small imperfection becomes the part I love most. I recall reading one with tea steam rising, the kitchen lights low and a familiar comfort settling in.
Steps
- Choose a lightweight stationery and a contrasting envelope size that complements the paper texture.
- Fold the paper into a compact square or rectangle that fits snugly into the chosen envelope.
- Write a short, heartfelt message with a steady pen, allowing natural pauses and personal notes.
- Tuck the note inside the envelope and seal the flap by pressing firmly along the edge.
- Present the envelope nestled among flowers, on a mug handle, or slipped into a book.
Mason jar painted vase with wildflowers

There is something comforting about a painted jar catching afternoon light on a windowsill. The brush marks keep evidence of care, a tactile story that blends with the rough mouth of the jar.
Wildflowers give the arrangement a casual energy; their stems lean and heads nod in a way that feels honest and alive. I remember the smell of dried paint and summer air mixing, and the small thrill when a neighbor paused to admire the colors against chipped white trim.
Steps
- Prepare a clean mason jar and select paint colors that reflect a warm or pastel palette.
- Apply paint in thin layers for a translucent effect or thicker strokes for texture, allowing intervals to dry.
- Add subtle details like bands, dots, or soft brush strokes to create a hand-finished look.
- Fill the jar with water and arrange freshly picked wildflowers or garden clippings.
Pressed flower resin bookmarks with shimmer

The sheen of resin over a pressed flower catches light in a way that is unexpectedly mesmerizing. Each bookmark holds a tiny landscape of petals and veins, the texture of the pressed flora visible beneath the glossy surface.
I enjoy the quiet way a bookmark can become a little archive of time spent outdoors; the scent of paper mingles with faint floral memory when a page is turned. There is a personal thrill in matching a bloom’s color to the cover of a current read.
Steps
- Select delicate flowers and press them flat until fully dry on absorbent paper.
- Prepare a thin layer of clear resin in a mold suited to bookmark dimensions.
- Place pressed flowers onto the resin layer and pour another thin coating to encapsulate them.
- Allow the resin to cure fully, then remove from the mold and sand edges for smoothness.
- Add a small tassel or ribbon through a punched hole at the top.
Homemade lavender-scented sachets for drawers

A sachet tucked among linens brings a discreet, calming scent each time a drawer opens. The fabric has a soft rub that speaks of many mornings spent folding and refolding, and the lavender breathes a faint herbal sigh when the cloth is handled.
I often fold my hands around a sachet and think of the slow rhythm of drying stalks in a sunny attic. The colors of the fabric can be cheerful or quiet, depending on the mood intended for the recipient.
Steps
- Cut two fabric rectangles of similar size from a breathable material like cotton or linen.
- Place a spoonful of dried lavender buds between the layers and align edges.
- Sew around the perimeter, leaving a small opening, then turn the sachet right side out.
- Close the opening with neat stitches and press lightly for a tidy finish.
Personalized photo collage on reclaimed wood

A collage arranged on reclaimed wood carries both visual warmth and a hint of weathered history. The grain and tiny knots of the board frame photographs like a timeline, and fingerprints around the edges make the piece feel lived-in.
I have stood with a string of images held against aged planks, rearranging until the sequence felt conversational. The result sits quiet on a shelf, the colors of the photos softened by the wood’s tone, inviting slow smiles from anyone who glances its way.
Steps
- Select a range of favorite photographs and lay them out on a flat surface to find a pleasing arrangement.
- Trim edges if needed to harmonize sizes and balance the composition.
- Position photos on a reclaimed wood panel, creating a collage layout that feels natural.
- Seal the images to the board with an archival adhesive and finish with a protective coating.
Embroidered linen handkerchief with floral motif

There is a comforting quiet in tracing the embroidered stitches of a linen handkerchief, the threads catching light as the piece moves. The fabric holds a cool, slightly crisp touch that contrasts with the raised tactile trail of thread.
I remember passing one across a kitchen table and watching the sunlight make the tiny stitches glow; the effort looked like care. Each stitched petal reads like a small, patient pause in time, a hand-made punctuation that turns a practical item into something intimate.
Steps
- Choose a fine linen square and sketch a simple floral motif onto the fabric surface.
- Thread a needle with embroidery floss and create varied stitches to build petals, stems, and leaves.
- Work slowly to maintain even tension and maintain the design proportions across the cloth.
- Tie off threads neatly on the reverse side and press the finished handkerchief gently.
Tea-light candles nestled in vintage teacups

There is a humble elegance in a flicker held by a small teacup. The ceramic rim glows softly when the flame moves, and the scent of wax slightly warmed brings memories of cozy evenings.
I like the way a mismatched set creates a little parade of light across a table, each cup reflecting a different pattern. The heat leaves the inside smooth and glossy while the outside carries collectible charm.
It feels like gifting a small, portable moment of calm.
Steps
- Select vintage or mismatched teacups that are clean and heat-resistant.
- Melt candle wax and add a few drops of a gentle fragrance if desired.
- Place a wick in the center of each cup and pour wax carefully to surround the wick.
- Allow the wax to cool and trim the wick before presenting the candle.
Memory jar filled with handwritten prompts

A jar full of folded notes sits like a small repository of weather and mood. Pulling one out feels like opening a tiny window onto a remembered laugh or scent.
The paper edges rustle and the handwriting varies in tilt and pressure, a kind of audible intimacy. I often hear someone say aloud the prompt and watch a conversation bloom, the room filling with quiet revelations.
The glass catches light and creates a jewel-like presence on a mantle or bedside table.
Steps
- Gather a clean glass jar and a stack of small papers cut to a uniform size.
- Write prompts, memories, or short anecdotes on each slip of paper.
- Fold the papers and place them into the jar until it feels pleasantly full.
- Seal the jar with a lid and add a decorative tag or ribbon if desired.
Upcycled book page bookmarks with tassels

Turning a vintage book page into a bookmark feels like giving a quiet second life to words. The paper has a papery grain and a faint scent of old glue and dust that adds a nostalgic layer.
Scissor edges and a tassel create a tactile contrast, and when the corner peeks from a closed book it reads like a wink. I remember tucking one into a paperback and watching someone smile when they discovered the page marker.
It’s a small, literate gesture that carries personality.
Steps
- Select pages from a damaged or discarded book and cut them into bookmark-sized strips.
- Laminate or reinforce the paper with a thin backing for durability.
- Punch a hole near the top and thread a decorative tassel or ribbon through.
- Round corners if desired and press the bookmarks flat before gifting.
Beaded bracelet with a tiny birthstone charm

A bracelet that grazes the wrist carries small movements and quiet clinks that become part of a day’s rhythm. The beads catch light differently as the arm turns, and a birthstone charm adds a moment that shimmers with personal meaning.
I remember watching someone tuck the bracelet under a sleeve and smile, the coolness of beads against skin becoming a small comfort. The combination of colors and the weight of the piece make it feel like a wearable memory rather than just an accessory.
Steps
- Choose a stringing material and select beads that complement the chosen birthstone charm.
- Measure wrist circumference and thread beads in a balanced pattern, leaving room for the clasp.
- Add the birthstone charm at a central or offset position and secure with crimps or knots.
- Attach a clasp and test the fit, making minor adjustments as needed.
Painted river rock paperweights with messages

River rocks have a smooth, cool heft that settles in the palm like a little island. When paint meets that surface, the contrast is tactile and vivid; the brush strokes soften against the stone’s natural patina.
A tiny message on the underside or along the curve feels like a secret tucked into an everyday place. I like the moment someone lifts the rock to read what’s written: the surprise, then a softened expression, as if a private note has entered public view.
Steps
- Collect smooth river rocks and wash them to remove dust or residue.
- Prime the stones with a base coat of paint for better color adhesion.
- Paint designs or messages onto the stones and allow them to dry thoroughly.
- Seal with a clear finish to protect the artwork and enhance color depth.
Recipe card box with family favorites tucked inside

A small box of recipe cards feels like an heirloom in miniature, the corners softened by handling and the handwriting a living trace of kitchen afternoons. The paper may bear faint grease spots, which only add to the authenticity of a well-loved formula.
I remember flipping through a stack while the smell of simmering sauce filled the air, recognizing handwriting that belongs to relatives and friends. The box sits ready on a counter, an invitation to recreate the tastes that map a family’s past.
Steps
- Choose a sturdy box and design matching recipe cards for a cohesive set.
- Handwrite or print favorite family recipes onto the cards with clear headings.
- Organize the cards by category and place them neatly into the box.
- Add a divider or label for quick reference and close the box for safekeeping.
Clay thumbprint pendant keepsake for necklaces

A pendant that carries a thumbprint feels like a miniature map of a moment, the ridges pressed into clay capturing a pause. The cool matte of fired clay contrasts with any metal it hangs from, and the tiny indentation refracts light in a private way.
I have held one close and tried to trace the lines with a fingertip, feeling oddly connected to the instant it was made. The pendant settles low on a chest and becomes a quiet, wearable notice of someone dear.
Steps
- Roll out a small piece of air-dry or oven-bake clay to an even thickness.
- Press a thumb or fingertip gently into the clay to create a clear impression.
- Shape the pendant edge and create a small hole for threading before drying or baking.
- Finish with paint, patina, or a protective varnish, then thread onto a chain.
Fabric-covered journal with hidden inside pocket

A fabric-covered journal invites fingers to linger over a cloth spine and the soft sound of pages turning. The inside pocket tucks away tiny ephemera—receipts, notes, a pressed petal—creating a private archive.
I keep one on a bedside table and love how the cover pattern changes its mood depending on light. The weight of the journal when picked up feels reassuring, like lifting a small chest of thoughts.
The sewn edges, the texture of the fabric, and the faint smell of paper all add to the experience.
Steps
- Select a blank journal and a piece of fabric large enough to wrap the cover.
- Adhere fabric smoothly to the journal cover, folding edges neatly around corners.
- Create a pocket from leftover fabric or paper and attach it to the inside back cover.
- Press the cover flat and allow adhesives to set before gifting.
Bath salt blend in a glass jar with label

A jar of bath salts looks like a small apothecary, crystalline textures catching light like tiny snowflakes. The scent of citrus or eucalyptus rises when the lid is lifted, bright and immediate.
I imagine a quiet evening where the salts dissolve and the water becomes a subtle perfume. The tactile sensation of scooping grains into a palm has a kind of domestic ceremony to it; the sound is soft, almost like distant rain.
The jar itself can sit on a shelf and feel both helpful and ornamental.
Steps
- Combine coarse salts with chosen aromatic elements and carrier oils in a mixing bowl.
- Stir thoroughly to distribute scent and any colorants evenly throughout the blend.
- Transfer the mixture into a clean glass jar and seal the lid tightly.
- Create and attach a simple label indicating the scent and suggested usage.
Hand-stamped brass keyring with initials

A brass tag dangling from keys catches light and gains a softened shine with handling. The stamped initials sink into the metal, creating a small, indelible story.
I like the clink of keys against metal, and this particular clink has an intimate punctuation to it. Over time the brass develops a gentle patina that feels like a companion to daily routines.
Presenting such a keyring seems to bless the ordinary work of leaving and returning, turning it into a ritual touched by thought.
Steps
- Choose a brass tag and plan the initials or short inscription to stamp onto the surface.
- Use metal stamps and a firm backing to create clean impressions on the brass.
- Buff the tag and apply a sealant if desired to control the patina over time.
- Attach the tag to a sturdy keyring and present it with a small card.
Herb garden starter in a painted tin container

A painted tin with tiny shoots poking up feels like optimism in miniature. The scent of fresh basil or mint releases every time the container is approached, and soil texture contrasts with the smooth painted rim.
I once watched a tiny basil leaf unfurl and felt that small domestic triumph wash over the kitchen. The container’s painted surface may carry visible brush marks and chips that hint at many future harvests.
Positioned on a sill, the herbs make a small, living punctuation to the room.
Steps
- Choose a clean tin container and prepare it with drainage by creating a small hole if needed.
- Paint the exterior with weather-resistant paint and allow it to dry fully.
- Fill the container with potting mix and plant herb seedlings or seeds at appropriate depths.
- Place the tin where it receives ample light and water according to the herb needs.
Felt flower bouquet in a rustic mason jar

A bouquet of felt blooms reads like spring in a deliberately soft register; the edges of felt keep light from catching, creating a cozy matte impression. The stems have a slight give and the flowers retain their shape without wilting, making them a lasting presence on a kitchen table.
I enjoy arranging different sizes together, watching how color combinations shift the mood of the bunch. The jar that holds them may show water marks even without water, and that contradiction makes the arrangement feel playful and quietly sentimental.
Steps
- Cut felt petals and assemble them into flower shapes with stitching or adhesive at the center.
- Affix stems using floral wire wrapped in green tape for a finished look.
- Arrange the felt flowers into a mason jar or rustic vessel to create a balanced bouquet.
- Trim stem lengths as needed to achieve the desired silhouette in the jar.
Photo transfer coaster set on cork bases

A coaster that carries an image feels both practical and sentimental; the photo is a small stage on a humble circle of cork. The soft scrape of a glass on the surface and the faint echo of droplets give the coaster a life of its own.
I have watched coffee rings outline a favorite portrait and then be wiped away, the image peeking through as though it had weathered a minor storm. The warmth of a tabletop and the dampness of a cup balance each other in a quiet domestic rhythm.
Steps
- Prepare small cork coaster rounds and select photographs sized to fit each surface.
- Apply a photo transfer medium to the coaster and press the printed image onto the surface.
- Allow the transfer to cure, then gently remove the paper backing to reveal the transferred image.
- Seal the coasters with a protective finish to guard against moisture and wear.
Cork bulletin board framed with decorative trim

A cork board framed with a decorative edge becomes an altar for everyday life: notes, clippings, and tickets pinned like tiny declarations. The cork yields with a quiet pop when pins enter, and the frame’s finish gives it a homey gravity.
I enjoy watching a collage take shape over time, sticky notes migrating and new photos layered at angles. The tactile contrast of the soft cork and the polished frame invites touching, and the board often ends up in a kitchen where it collects small vitalities of daily living.
Steps
- Cut a cork sheet to the desired size and mount it onto a sturdy backing board.
- Select a decorative trim or frame and secure it around the cork perimeter.
- Attach hanging hardware to the back for wall display and test stability.
- Pin a few starter notes, photos, or mementos to personalize the board.
Custom playlist card and miniature sleeve

A small card that lists a playlist can feel like a soundtrack wrapped in paper; the titles read like line breaks in a conversation. The sleeve that holds the card gives a tactile ritual to selecting music, and the paper’s grain adds a quiet ceremony to pressing a track play.
I once handed one to someone who smiled at a particular song title as if bumped by memory, and the whole room seemed to shift a little. It is an offering of time that arrives in sound and paper.
Steps
- Curate a handwritten or printed list of songs and format it onto a compact card.
- Design a miniature sleeve with decorative paper or recycled materials sized to fit the card.
- Slide the playlist card into the sleeve and add a small note about mood or memory.
- Present the sleeve with instructions for accessing the tracks if provided digitally.