I always find a quiet pleasure in slow, hands-on projects around the holidays. The tactile rhythm of stitching felt, pressing cookie-cutter shapes into dough, or threading tiny beads has a way of turning a cluttered evening into something gentle and bright.
Handmade Christmas Ornament Crafts have been my cozy ritual for years, a mix of childhood curiosity and grown-up patience.
Each season brings a handful of fresh ideas and familiar favorites. I like to experiment with textures and scents, and the rituals of hanging those small pieces on the tree feel quietly meaningful.
These ornaments tell small stories of kitchen counters, living-room laughter, and paper scattered across the floor.
Why I Love Salt dough holiday ornaments

The pale, warm smell of baked salt dough always brings back kitchen afternoons. I remember the slight resistance under my fingertips as I pressed shapes, and the faint tooth of the surface once it cooled.
Painted details look mellow and domestic, with matte whites and muted reds resting against the grain of wood. When hung, they give off a handmade, old-fashioned character that feels comforting.
Each one carries fingerprint impressions and tiny imperfections that read like a familiar face when the tree lights blink softly in the evening.
Steps
- Mix flour, salt, and warm water into a pliable dough on a clean surface.
- Roll dough to an even thickness and press ornaments with cutters or molds.
- Bake ornaments on a sheet until they feel firm and slightly golden.
- Sand edges gently for smoothness and paint with acrylic colors and small brushes.
- Thread ribbon or twine through a drilled hole and hang to dry fully.
Felt animal ornaments with visible hand stitching

Soft wool felt evokes a textile warmth that feels particularly cozy on a cold evening. I enjoy the quiet rhythm of visible blanket stitches that outline tiny foxes, owls, and reindeer; the thread stands out against the matte felt like friendly veins.
Buttons for eyes and a smudge of rosy blush on cheeks bring the pieces to life. The edges are plush and slightly raised, offering a tactile invitation when reaching past tinsel to select a familiar face from the branches.
They hang with a gentle, fabric sway that feels intimate.
Steps
- Trace simple animal shapes onto felt and cut matching front and back pieces.
- Place small embellishments between layers and align edges carefully.
- Sew around edges with visible blanket stitches to create a charming outline.
- Add small accents such as felt leaves, button eyes, or blush with a sponge.
- Attach a small loop of thread or ribbon for hanging.
Origami paper stars that gleam in tree light

Thin patterned paper folds into crisp, starry silhouettes that catch holiday light in a playful way. I remember the satisfying snap when a flap locks into place and how metallic paper throws tiny reflections across a room.
The edges make faint papery sounds when turned toward a lamp, and layered patterns create a depth that looks complex from across the room. They feel lightweight and ephemeral, like a quiet paper constellation tucked among glass baubles and evergreen.
Tucking one behind a sprig of pine always makes me smile.
Steps
- Choose square sheets of decorative paper, including metallic or patterned varieties.
- Follow a modular star folding technique to create repeating units and interlock them.
- Press folds crisply and align points for a symmetrical result.
- Optionally add a small dab of adhesive at hidden seams for extra hold.
- Thread a thin ribbon through a point to hang on the tree.
Cinnamon stick bundles with rustic charm

The spicy warmth drifting from bundled cinnamon is immediate and nostalgic. I like the rough texture of bark and how the sticks fit together into a small, tactile bundle that smells faintly of spice even when stored.
Tied with a thin strip of linen or twine, the bundle looks like a tiny hearth accessory, transporting the room to a kitchen where spices simmer. The color is a cozy, earthy brown that complements both vintage and modern trees.
It feels wholesome and aromatic, a humble accent that invites a slow inhale.
Steps
- Select uniform cinnamon sticks and align their ends evenly on a flat surface.
- Wrap a length of twine or ribbon around the center and secure snugly.
- Add a small decorative accent such as a dried orange slice or clove sprig.
- Tie a hanging loop at the top of the twine.
- Trim any excess fiber for a neat presentation.
Mini evergreen wreaths for tiny, green accents

A tiny ring of evergreen feels like a miniature forest encircled around a branch. I enjoy the contrast between the glossy needles and the soft wreath base, and the faint resinous scent that lingers when the wreath is handled.
Little berries or a sliver of ribbon add a festive punctuation, and the circular shape reads as a quiet symbol of continuity. When lights hit the needles just so, the whole ring seems to sparkle.
These pieces bring a living, botanical note to the tree without overwhelming the other ornaments.
Steps
- Form a small circular base from flexible wire or natural vine and wrap it tightly.
- Layer short sprigs of evergreen around the base, overlapping to hide the stems.
- Secure each sprig with thin wire or floral tape to maintain the shape.
- Add tiny accents like faux berries or a slim ribbon bow.
- Create a hanging loop with thread or thin wire and trim stray bits.
Glass bauble snow scenes inside tiny jars

Clear glass orbs capture a miniature winter world that invites a closer look. I remember arranging a small paper house and a speck of faux snow inside one and feeling a private delight when the scene shifted with every tilt.
Reflections across the glass create tiny highlights that make the interior feel alive, like a frozen glint of daybreak. The cool, smooth surface of the glass contrasts with the fluffy, matte powder inside, giving a satisfying tactile idea even without touching.
Hung near a light, each orb warms into a miniature lantern.
Steps
- Clean a clear glass or plastic ornament and remove a cap for access.
- Place a tiny paper or ceramic figure and a sprinkle of faux snow inside.
- Add small natural items like a twig or a speck of moss to build the scene.
- Replace the cap and secure with a narrow strip of adhesive if needed.
- Thread a loop for hanging and position near soft lighting.
Paper quilled snowflakes with delicate curls

Watching narrow strips curl into lacy forms feels soothing in a slow, patient way. The thin rolled coils gather into spokes and flourish into snowflake arms that look fragile but hold shape surprisingly well.
Paper edges catch light along their ridged spirals, offering a slight sheen that reads like frost. I enjoyed arranging several on a dark branch to let the fine shadows play across the surface.
The overall effect is airy and slightly nostalgic, like an heirloom doily translated into three-dimensional winter geometry.
Steps
- Select narrow cardstock strips in whites, soft blues, or metallics.
- Roll strips into coils and shape them into teardrops, marquise, and tight circles.
- Arrange quilled shapes into a radial snowflake pattern on a backing disc.
- Adhere pieces carefully with small dots of clear adhesive along seams.
- Add a thin ribbon loop for hanging and allow to dry completely.
Upcycled sweater baubles with fuzzy comfort

The pill-soft surface of sweater fabric brings a cozy, textile warmth to the tree. I have a soft spot for the tiny rolled hems and the faint fuzz that rises when handled; they catch light differently than smooth baubles.
Patterns from old knitwear—tiny Fair Isle bands or ribbed cuffs—introduce a nostalgic color story that reminds me of rainy afternoons and worn-in sweaters. Each bauble carries the scent of stored closets and late autumn afternoons.
They look lived-in, like a small piece of a larger, well-loved garment hanging among glass and metal.
Steps
- Select small ornaments or foam balls and cut sweater fabric into panels slightly larger than each base.
- Stretch fabric around the base and secure edges at the back with pins or narrow adhesive.
- Tuck or trim excess fabric neatly and add decorative stitches or tiny buttons if desired.
- Attach a hanging loop with thread or slim ribbon.
- Fluff surface fibers gently for a cozy, textured finish.
Rustic wood slice ornaments with bark edges

Thin cross-sections of branch carry a grounded, forested character that feels very present. I like the warm rings and tiny knots revealed in the grain, each slice a small geography of a tree’s life.
The rough bark rim adds contrast, a tactile border that resists the gloss of other decorations. Natural stains deepen the wood tone and let the rings glow slightly under a soft lamp.
When clustered together, they read like a tiny woodland map, bringing a calm, organic note to the tree’s sparkle and shimmer.
Steps
- Cut thin wood slices from small branches and let them dry thoroughly to prevent cracking.
- Lightly sand surfaces for smoothness and preserve bark edges intact.
- Apply a thin coat of clear finish to enhance grain and protect the surface.
- Drill a small hole near the top for threading a loop.
- Add twine or leather cord for hanging and optional painted initials or dates.
Beaded icicles catching every bit of light

A strand of faceted beads finds a way to mimic frozen drops that shimmer against darker greens. I enjoy how each bead refracts bulbs and candles into miniature stars, and how a tiny metal cap gives a hint of structure to an otherwise delicate line.
The cool clink of glass beads when they move gives a little musical shimmer. Hung at different lengths, they create a staggered glint that looks almost like a curtain of frost.
They feel elegant and a bit playful, like captured winter sunlight.
Steps
- Select a sequence of clear, frosted, and metallic beads to create varied sparkle.
- Thread beads onto thin beading wire in a tapered arrangement for an icicle silhouette.
- Secure the wire end within a small metal cap and crimp firmly for hold.
- Attach a loop for hanging and trim excess wire neatly.
- Arrange multiple icicles on the tree for layered sparkle.
Vintage button ornaments that feel like heirlooms

A small circle of mismatched buttons collects a kind of domestic history in a compact form. I often find myself smiling at a tiny pearl button next to a mother-of-pearl shard and a painted wooden disc, each with its own scratch or sheen.
The tactile layering and different heights give a charming relief, while muted pastels or glossy blacks provide quiet contrast. These ornaments seem to hold stories of old coats and dresses, and when they catch the light they offer a tactile little memoir on the branch.
Steps
- Gather a varied selection of buttons in complementary colors and textures.
- Arrange them on a flat backing such as cardboard or thin wood to form a pleasing cluster.
- Secure each button with small dots of adhesive or by stitching onto a fabric base.
- Add a ribbon or loop at the top for hanging and trim any loose threads.
- Optionally varnish the backing for added durability and a finished look.
Hand-painted ceramic tags with soft glaze sheen

Little ceramic tags feel like tiny canvases kissed by glaze. I enjoy the cool, smooth touch of fired clay and the way brush strokes hold a faint texture beneath a glossy finish.
Muted washes of color settle into tiny imperfections, giving each tag a gentle, human touch. When hung near a bulb, the glaze catches light differently across curves and flat planes, producing a quiet glow.
Names, dates, or simple motifs read as personal notes, and their weight offers a satisfying contrast to lighter ornaments fluttering nearby.
Steps
- Roll earthenware clay to a uniform thickness and cut tags with a small cutter or stencil.
- Pierce a small hole near the top for hanging before the clay dries.
- Fire the clay according to the clay’s instructions, then apply underglaze or ceramic paints.
- Apply a clear glaze and fire again to achieve a glossy finish.
- Thread ribbon or twine through the hole and hang when fully cooled.
Cork reindeer with little twig antlers

A recycled wine cork transforms into a tiny creature with an unexpectedly charming personality. I love the contrast between the cork’s soft, slightly porous surface and sharp, twig antlers that jut up like a miniature crown.
A pair of bead eyes and a reddened nose bring on a playful expression that feels a little mischievous. The scent of cork brings a subtle vineyard memory, and the compact shape makes these ornaments feel like a small, cheeky wink among more formal decorations.
They sit well clustered or scattered across the tree.
Steps
- Select clean corks and trim them to a uniform height if needed.
- Insert two small twig pieces into the top to suggest antlers and secure.
- Add bead eyes and a small painted or felt nose to the front.
- Affix a thin wire or ribbon loop at the rear for hanging.
- Optionally varnish the cork lightly to protect the surface.
Cross-stitched hoops with tiny festive motifs

A small embroidery hoop frames neat little counted-stitch images that feel quietly meticulous. I find the repetitive motion soothing, and the tiny X-shaped stitches make a subtle textured surface that invites a second look.
Traditional color palettes—deep greens, soft creams, and berry reds—sit comfortably against the fabric ground, like a postage-stamp memory of craft hours. The wooden hoop adds a gentle, circular frame and a warm natural tone.
Hung from a ribbon, each piece reads as a small handcrafted badge of time spent with needle and thread.
Steps
- Hoop a small piece of evenweave or Aida fabric and transfer a simple motif pattern.
- Thread embroidery floss and follow the pattern with neat, consistent X-shaped stitches.
- Once stitching is complete, trim excess fabric and secure the backing.
- Tighten the hoop and optionally sand and varnish the outer edge for a smooth finish.
- Add a ribbon for hanging and store flat until decorating the tree.
Pressed leaf ornaments encased in clear resin

I enjoy how a single pressed leaf becomes an exquisite flat jewel when sealed inside clear resin. The delicate veins look like miniature rivers, and the translucence lets light pass through in a way that feels fresh and botanical.
The resin surface is cool and glassy under the fingertips, while the preserved leaf retains a slightly papery memory. Grouped together, these pieces read like a small herbaria, and the play of natural shapes against twinkling lights brings a quiet, green whisper to indoor winter decor.
Steps
- Press and dry leaves thoroughly to remove moisture and flatten them completely.
- Pour a thin layer of clear resin into a mold and let it reach a tacky state.
- Place pressed leaves gently onto the resin layer and cover with an additional resin pour.
- Remove bubbles with a small heat source and allow the resin to cure fully.
- Sand edges if needed and add a drilled hole or eye pin for hanging.
Hand-poured wax ornaments scented with orange peel
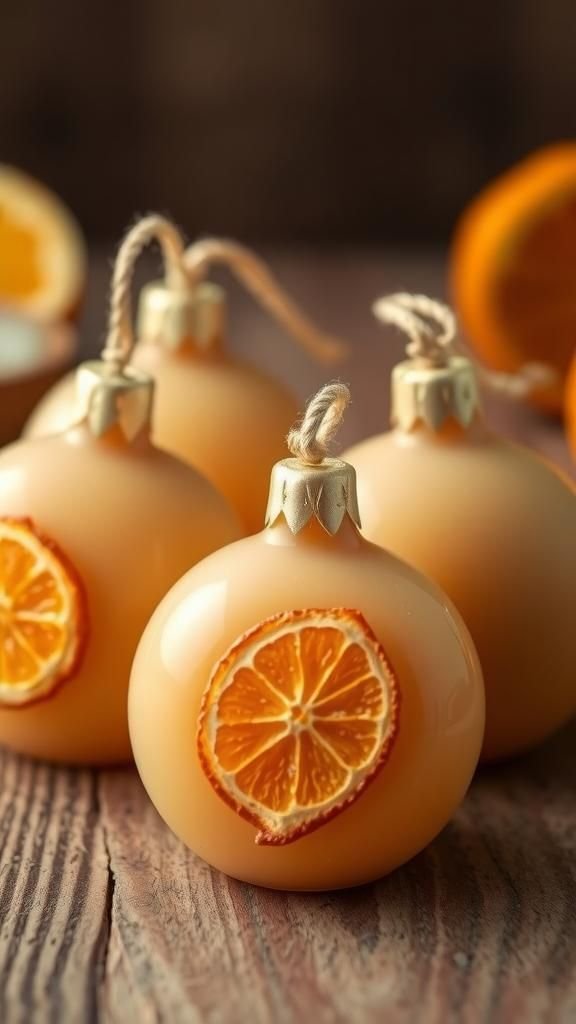
Warm citrus notes mingle with the soft wax, conjuring afternoons slicing peels at the kitchen window. The surface of poured wax holds a faint, cloudy bloom that scatters light into small halos, while embedded citrus rinds add visual texture and a hint of color.
The cool, slightly tacky feel of the underside contrasts with a gently matte top. Hanging near other ornaments, they lend a cozy, aromatic presence that feels intimate, like a jar of simmering potpourri condensed into a tiny, fragrant pendant for the tree.
Steps
- Melt a block of natural wax in a double boiler until smooth and clear.
- Add thinly sliced dried orange peel and a few drops of essential oil for scent.
- Pour wax carefully into silicone molds and allow to cool until set.
- Remove from molds and trim any rough edges, creating a small hanging hole if needed.
- Thread ribbon or twine through the hole and store in a cool place.
Tiny terrarium baubles with moss and mini cones

A little pocket of green moss and a miniature pine cone inside a clear bauble reads like a tiny landscape hugged by glass. The living texture of moss contrasts with the smooth globe, offering a fresh, damp forest scent if handled.
I like the way light refracts through the orb to create pockets of brightness within the miniature scene. These baubles feel alive and breathing in a private, tidy way—as if the tree holds a string of miniature clear globes full of tiny, mossy secret gardens.
Steps
- Select clear glass or plastic baubles that open for filling.
- Add a small amount of preserved moss and miniature natural elements like tiny cones or twigs.
- Arrange elements inside with tweezers for a pleasing composition.
- Close the bauble securely and wipe away any fingerprints.
- Attach a thin ribbon for hanging and display near soft lighting.
Stained-glass effect ornaments with translucent beads

Fragments of colorful translucent beads and thin metal lines make up a luminous mosaic that glows when backlit. I remember arranging shards of colored glass in a small circle and watching the sun pour through them, turning the bauble into a pocket of stained color.
The interplay of light and shadow felt unexpectedly dramatic for such a small piece, and the smooth, cool texture of the beads contrasted with the slight roughness of metal edging. Hung in a bright window, each ornament becomes a micro stained-glass panel.
Steps
- Create a simple wire frame in the desired shape and ensure edges are smooth.
- Thread or embed translucent glass beads and small glass shards into the frame.
- Secure pieces in place with narrow wire wraps or bezeling techniques.
- Polish the metal edges and clear any residue from glass surfaces.
- Add a ribbon loop for hanging and position where light will pass through.
Pom-pom Santas with cottony beards and caps

Soft pom-poms create a fluffy, cheerful little face that brings an instant grin. I love the way the yarn forms a cloud of fibers around a tiny painted face, with a burlap cap or felt hat perched jauntily on top.
The texture is irresistibly tactile, and the puff of the beard contrasts with a small shiny bead nose. They sway slightly when the branch moves, and their hand-sewn smiles feel a bit silly in the best way.
These ornaments have an improvisational charm that reads as playful and affectionate.
Steps
- Make two pom-poms of different sizes for head and beard and trim for shape.
- Attach a small wooden bead or felt piece for the nose between the pom-poms.
- Craft a little hat from felt or fabric and secure it atop the head.
- Add small painted or bead eyes and a stitched smile.
- Affix a string loop at the top of the hat for hanging.
Mini chalkboard tags for handwritten notes

A tiny chalkboard feels like an invitation to leave a quick, personal line on the tree. I remember writing short wishes in looping hand and smudging the corner slightly, leaving the trace of the gesture.
The matte black surface contrasts nicely with chalk’s soft white, and the faint fragrance of cedar from the branch seems to frame each phrase. These tags feel adaptable and intimate; a small message tucked among baubles suddenly turns the tree into a diary of short, seasonal notes and private greetings.
Steps
- Cut small pieces of thin wood or heavy cardboard into tag shapes and paint them with chalkboard paint.
- Allow the paint to cure fully and lightly season the surface with chalk before writing.
- Use a piece of chalk or a chalk marker to add names or short messages.
- Attach a ribbon or twine loop for hanging and tidy any chalk dust.
- Store gently to preserve the painted surface for reuse.
Tiny knitted stockings with delicate ribbing

A miniature stocking knitted in soft yarn captures a cozy domestic memory in miniature form. The ribbed cuff and tiny heel hold little shadows that invite a close look, and the yarn’s slight fuzz picks up tree light in a soft shimmer.
I have a small drawer of these, each with a different color band, and they feel like comforts from a slow morning. Their small size means each stocking can hold the smallest of things or simply sit as a promise of warmth.
They bring a quiet, textural note to the tree.
Steps
- Cast on a small number of stitches and knit a short, ribbed cuff in fine yarn.
- Continue knitting the body in stockinette until reaching desired length.
- Shape a tiny heel and toe by decreasing stitches and securing ends.
- Weave in loose yarn tails and add a small hanging loop at the cuff.
- Block gently to even out stitches and allow to dry.