I always seem to end up with a tangle of markers the first warm weekend of the year, trying to remember where last season’s herbs were hiding. Making DIY garden marker crafts became a small ritual for me, a way to slow down, touch soil, and add a little personality to the beds.
Over time the markers turned into a collection of textures and colors that make checking on seedlings feel like visiting old friends.
These DIY garden marker crafts pushed me to experiment with odd bits from around the house, to notice the grain of wood and the weight of a stone, and to keep little handwritten labels that weather and tell stories alongside the plants themselves.
Hand-painted wooden spoon garden markers with charm

There is something homey about a row of wooden spoons poking out of a herb patch. The grain warms under the fingertips and the rounded handles sit comfortably while letters in a neat script catch the light.
I remember the slight tack of fresh color under a late afternoon sun and the way the scent of cedar mingled with rosemary. Over months the edges softened and the hues mellowed, creating an inviting, lived-in look that made the whole kitchen-garden corner feel like a slow, friendly companion.
Steps
- Gather smooth wooden spoons, fine-tip outdoor markers, acrylic color, and clear varnish.
- Smooth any rough spots with fine-grit paper and wipe away residue with a damp cloth.
- Decorate handles with color accents and lettering for plant names, allowing drying time between layers.
- Brush a thin coat of clear varnish for weather protection and let it cure according to product notes.
- Press the handles into the soil so labels sit upright beside each plant.
Wine cork markers with handwritten plant names

Tiny cork stubs lend a playful, cottage-like touch when lined up between lettuce rows. The porous texture absorbs ink and the tops take a small doodle easily, giving each marker a cozy, handmade personality.
I liked pressing a slender stick into the hollow, feeling the slight give as it anchored, and noticing how rain darkened the corks a little, bringing out the brown flecks. The whole set ends up feeling like a patchwork of quiet memories from evenings shared over bottles and kitchen chatter.
Steps
- Collect wine corks, thin wooden skewers, permanent fine-tip markers, and an awl or similar tool.
- Create a shallow pilot hole in each cork for the skewer by twisting the awl carefully.
- Write plant names or little icons on the flat ends of the corks with the marker and allow ink to dry.
- Press skewers into the holes and plant the assembled markers into beds so names face up.
Smooth river stone plant labels with pastel hues

I often find stones on walks that feel like tiny treasures, smooth and cool in the palm. Turning a favored pebble into a marker gives it a second life, a small story at the base of a tomato plant.
The painted pastel script contrasts with the stone’s natural mottling, and the tiny ridges make every letter feel slightly textured. I liked how the stones settled into the earth, grounding a bed with their quiet weight, while flecks of sunlight would bounce off the painted edges during late afternoons.
Steps
- Select smooth river stones, acrylic pastel colors, and a weatherproof fine-tip pen.
- Clean stones and let them air dry until fully free of moisture.
- Apply a base color or leave natural, then add plant names or icons with the pen.
- Finish with a clear outdoor varnish for longevity and set stones at plant bases.
Repurposed silverware tags for cottage gardens

Old forks and spoons carry a comforting clink and a memory of dinners past when turned into tiny tags. The cool metal feels satisfying against the palm and catches dew in narrow grooves.
I enjoyed bending a tines-turned-flag so it stood just right, letting engraved initials and stamped letters catch the light. The slightly irregular type and tarnished edges lend a friendly, timeworn personality to the beds, and every time I touch those pieces I think of shared meals and the hands that once held them.
Steps
- Gather mismatched flatware, metal stamping kit or fine-tip permanent marker, and sturdy wire stakes.
- Clean and dry each piece, then create a fold or curl in the handle to make a staking point.
- Stamp or write short plant names or initials on the flatware surface and gently buff any rough spots.
- Slide or wrap the handle around the wire stake and press into the soil near the plant.
Clay stamped markers that weather gracefully

Soft, sun-warmed clay has its own quiet scent that always pulls me in. When turned into small discs with pressed letters, each marker feels like a tiny ceramic coin from a made-up place.
The edges often bear fingerprints, which I find charming rather than distracting, and the little impressions hold shadow in a pleasing way as daylight shifts. I once left a set tucked into a raised bed through a rainy spring and marveled at how the clay acquired a gentle, matte patina that only added to their warmth.
Steps
- Prepare air-dry or oven-bake clay and a clean surface for shaping.
- Roll small balls and flatten into discs of uniform thickness with a smooth tool.
- Press plant names or icons into each disc with letter stamps and smooth edges.
- Air-dry or bake according to clay instructions, then place discs on stakes or slide onto wires near plants.
Chalkboard-painted stakes for ever-changing garden notes

Matte black stakes with chalky handwriting feel playful and adaptable, like a tiny blackboard for the garden. The cool contrast between the dark surface and white letters is crisp, and the faint residue of erased words creates a soft, lived-in look.
I like the way hands smudge a corner when trying to read a hurried scrawl, or how a child’s looping letters add a touch of whimsy. On breezy mornings the light finds the chalk’s tiny ridges, making each letter feel tactile and slightly three-dimensional.
Steps
- Gather wooden or metal stakes, chalkboard paint, soft chalk sticks, and a small brush.
- Apply two thin coats of chalkboard paint to the flat labeling area and allow adequate drying time.
- Lightly rub chalk over the new surface and wipe to create a smooth base.
- Write plant names with chalk and refresh as needed throughout the season.
Copper wire cursive markers with natural patina

Copper has a warm, almost musical weight when wrapped into cursive letters. Watching the metal age into a green-tinged patina over time felt like witnessing a small transformation ceremony in the garden.
The slender lines catch sun at certain angles and throw a fine, rusty gleam when rain passes. I remember the quiet satisfaction of tucking a delicate name near a seedling and listening to a faint metallic tinkle on breezy days.
Those little copper signs read like handwriting from the earth itself.
Steps
- Select malleable copper wire and narrow-nosed pliers for shaping letters.
- Form cursive plant names by bending the wire into flowing shapes and trimming excess ends.
- Mount names onto short stakes by coiling wire around them or affixing with small metal ties.
- Allow the copper to age naturally outdoors for a soft patina.
Pressed flower resin markers with glossy finish

Embedding tiny pressed blooms in clear resin feels a bit like trapping a summer afternoon inside a small tile. The glossy surface magnifies veins and petals, turning fragile textures into durable, jewel-like pieces.
I liked running a thumb across one and feeling a cool, glassy smoothness while the colors underneath held their quiet brilliance. At dusk the resin caught the last light and sent back tiny reflections, making the markers look almost luminescent among greens.
They brought a delicate, floral whisper to beds that often shouted with foliage.
Steps
- Gather pressed flowers, small silicone molds, clear casting resin, and mixing tools.
- Place pressed blooms in the molds, pour a thin resin layer, and allow partial cure to suspend pieces.
- Add a final resin layer to encapsulate flowers fully and let cure according to resin directions.
- Remove cured pieces from molds and mount on stakes or wires near plants.
Upcycled plastic bottle markers for bright beds

Thin strips of bottle plastic bring a cheerful, slightly crinkly texture to a sunny patch. The synthetic sheen reflects light differently than wood or stone, and bright colors last like small flags bobbing over lettuce.
I remember the soft scrape of scissors on plastic and the faint, clean smell of recycled material, and how the labels seemed to flirt with the breeze. They never felt precious but rather practical and joyful, a little bit of color that made plant rows read like a casual, friendly map.
Steps
- Collect clean plastic bottles, weatherproof markers, and scissors appropriate for plastic.
- Cut flat strips of plastic from the bottle and smooth any sharp edges with fine sandpaper or a file.
- Write plant names or draw simple icons with weatherproof markers and allow ink to dry.
- Poke a small hole and slide strips onto stakes or tie to short sticks near plants.
Stamped metal washer markers with rustic appeal

Small metal washers make sturdy, industrial-chic tags that sit well in a kitchen garden. Their cold, smooth surfaces catch dew in tiny rings, and hammered impressions give each piece a little character.
I liked the faint echo when a breeze nudged a line of washers and the contrast of hard metal against soft basil leaves. Over time the edges gained a gentle rust that read like a weathered smile.
They felt like the practical cousins of more decorative markers, reliable and a bit wry.
Steps
- Gather flat metal washers, metal stamping letters, a hammer, and short metal stakes or wire.
- Place a washer on a sturdy surface and align stamps to create plant initials or short names.
- Strike stamps with firm, even blows for clear impressions and buff any sharp edges.
- Thread washers onto wire stakes or secure to short stakes and position beside plants.
Mosaic tile shards turned into colorful labels

Broken tile pieces arranged into tiny mosaics felt like making miniature maps for each bed. The ceramic surfaces offered a cool, glossy clink under the palm and reflected sunlight in fragmented flashes.
I enjoyed the random pattern language that emerged as glazed bits met grout edges, and the tactile contrast between smooth tiles and gritty grout. Those small, colorful labels became bright punctuation marks among leaves, and the irregular edges gave each a cheerful, handcrafted personality that stood out against the garden’s softer palette.
Steps
- Collect broken or leftover ceramic tiles, small grout mix, and short stakes or backing pieces.
- Arrange tile shards into a small pattern on the backing area and press gently into a thin bed of grout.
- Allow grout to set fully, then wipe any haze from tile surfaces with a damp cloth.
- Mount finished tile pieces on stakes and display them among plants.
Painted popsicle sticks for playful garden plots

There is a childlike delight in a bright line of popsicle stick markers, each a short, cheerful banner for a tiny row. Their thin, slightly splintery feel under the fingertip contrasts with glossy color bands and little handwritten names.
I remember making sets that matched seed packet art and leaving tiny dots where a paint brush had rested. They read like friendly flags on a miniature parade route, and watching a bee pause on a nearby leaf always made the whole arrangement feel like a small neighborhood of thriving life.
Steps
- Gather wooden craft sticks, outdoor-safe pigments or markers, and a fine-tip weatherproof pen.
- Apply color bands or leave them natural, allowing full drying between layers for clean results.
- Write plant names or small icons with the pen and let ink set.
- Nestle sticks into soil so names face outward and remain easily readable.
Seed-paper markers that double as tiny gifts

Paper embedded with seeds carries a soft, fibrous scent and a delicate, papery texture that invites gentle handling. When turned into small tags, the surfaces often hold faint impressions from pressed flowers or handwriting, creating a tender, nostalgic feel.
I liked the moment of tucking a tag into soil and imagining the tiny shoots that might later emerge from it. The idea that each marker could itself bloom sometime later felt like a quiet promise, a small loop between labeling now and watching new life begin.
Steps
- Prepare seed-embedded paper sheets or purchase ready-made seed paper and a hole punch or tag cutter.
- Cut small tag shapes and write plant names lightly with a pencil or fine pen.
- Thread onto stakes or tie to short sticks, and leave tags in the soil where they can biodegrade after serving as markers.
- Water around tags gently to encourage eventual sprouting if desired.
Vintage button markers with stamped plant initials
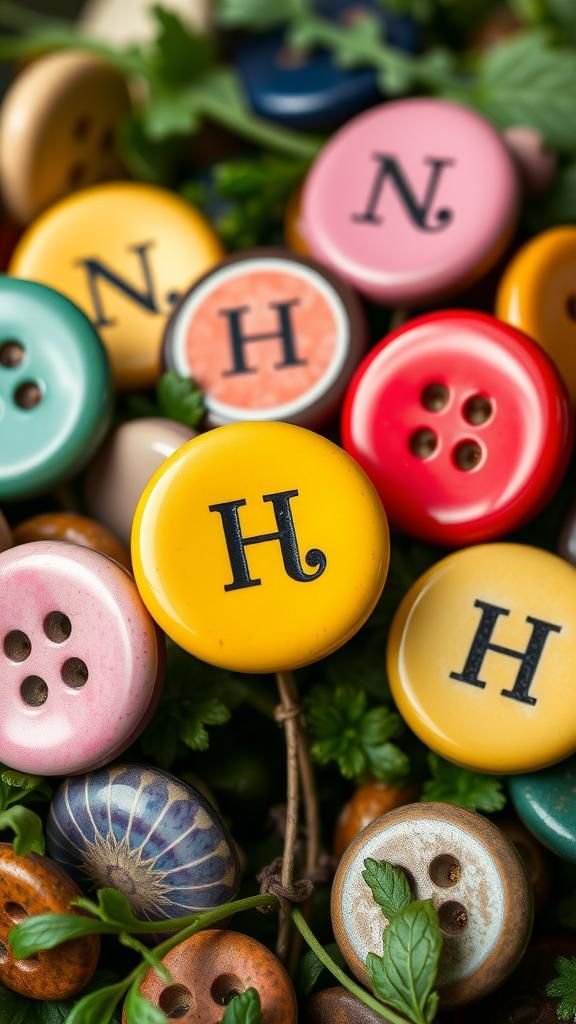
Tiny collections of buttons have a tactile charm that feels like rummaging through an attic drawer. When each button bears a stamped initial or tiny icon, they read like pocket-sized heirlooms scattered across a bed.
The glossy and matte finishes play with light differently, and I enjoyed pairing mismatched colors so each row had a rhythmic variety. There was a gentle satisfaction in the click when a button met a short stake and a quiet pleasure in seeing them peek up from between leaves like small, cheerful faces.
Steps
- Gather vintage or new buttons, metal stamps or fine-tip markers, and short wooden or metal stakes.
- Mark initials or tiny icons onto button faces and allow marking medium to dry completely.
- Affix buttons to stakes using thin wire, small screws, or adhesive alternatives suited to outdoor use.
- Position button markers among plants so they are visible yet snug against stems.
Terracotta shard labels with earthy textures

A broken pot shard carries the warm clay smell that always reminds me of potting afternoons. The coarse surface accepts scrappy lettering and little incised icons with a rustic, tactile quality that feels very grounded.
I liked the small weight of a shard in a pocket as I walked beds, then placing it so the warm orange tone contrasted with cool green leaves. Over time the edges softened and the color took on a sun-baked depth that made each shard feel like a small, quiet relic of the garden.
Steps
- Select cleaned terracotta shards of comfortable size and a sharp stylus or permanent marker for lettering.
- Inscribe plant names or icons into the clay surface while the shard is dry and stable.
- Brush away any loose dust and, if desired, apply a light coat of outdoor varnish for color preservation.
- Nestle shards into soils so lettering faces upward and stands near the corresponding plant.
Reclaimed pallet wood signage for kitchen herbs

Weathered pallet wood has a soft, fibrous feel and familiar echoes of past shipments and projects. When trimmed into short planks and brushed with gentle color, each sign felt like a small porch announcement.
The rough knots and grain added character to handwriting, and I enjoyed the scent of old pine meeting basil on a humid morning. Arranged in a tidy row, those reclaimed signs made the herb corner read like a neat, lived-in shelf, and every time I harvested a sprig I reached for a name that looked lovingly familiar.
Steps
- Gather reclaimed pallet boards, a hand saw for sizing, sandpaper for smoothing edges, and outdoor-safe ink or paint alternative.
- Cut boards to desired widths and smooth rough surfaces to avoid splinters.
- Add lettering or small icons with a weatherproof pen or colored pigment and allow drying time.
- Attach short stakes to the back edges and position signs within the herb patch.
Glass pebble labels that shimmer subtly in sun

Small glass pebbles feel cool and smooth and throw tiny refracted highlights when sunlight passes through them. Placing a printed tiny icon beneath the curve turns each pebble into a magnifying dome that makes details pop.
I enjoyed arranging a small cluster of colors and watching them wink as bees moved between blooms. Their transparent quality made them feel almost delicate, but they sat securely on soil or small backing pieces, adding a jewel-like punctuation that seemed to lift the whole bed with a hint of understated glamour.
Steps
- Collect flat glass pebbles, printed miniature icons or paper labels, and clear-drying adhesive.
- Affix the icon beneath each pebble and allow adhesive to cure fully.
- Mount pebbles onto small stakes or flat backing pieces and set them beside plants.
- Position so the curved surface magnifies the icon beneath for a subtle visual effect.
Leather tags with burned lettering and patina

Leather tags carry a warm, supple texture and a faint, comforting scent that often evokes leathery old books. Branding tiny letters into the surface creates a rich contrast between darker imprints and the sunny grain.
I liked the depressed feel beneath my fingertips where each letter settled and the way edges darkened slightly over time, lending a vintage look. Those tags dropped into soil felt sturdier than paper, and seeing their soft shine after watering always made the bed look a touch more curated and thoughtfully tended.
Steps
- Source small leather scraps, a fine wood-burning or leather-stamping tool, and short stakes or cord for mounting.
- Mark letter positions lightly in pencil, then create names or initials with the burning or stamping tool.
- Condition leather edges with a bit of leather balm if desired and thread tags onto stakes or tie to short sticks.
- Place tags beside plants where they can age slightly with exposure for added character.
Ceramic tile shards with hand-drawn icons
![]()
Small ceramic tiles with hand-drawn vegetable icons felt like little panels of garden shorthand. The glossy glaze contrasted with tiny, inked-line drawings and the cool, solid weight of each tile made them feel substantial.
I recall the quiet focus of sketching a carrot or basil leaf and how the simple black line read clearly from a short distance. When clustered along a row the tiles created a modest, graphic rhythm, like a tiny gallery opening in the soil where each piece showed a single, readable image.
Steps
- Collect small ceramic tiles or cut larger tiles into small pieces and clean surfaces.
- Draw plant icons or names with a fine permanent marker suitable for glazed surfaces.
- Allow marker to set, then protect with a clear outdoor-grade sealant if desired.
- Mount tiles on stakes or small backing pieces and place them among plants.
Magnetic markers for greenhouse window gardening

Magnetic labels on greenhouse glass feel clever and neat, like a small control panel for plant life. The cool smoothness of the magnet against the pane and the crisp, legible lettering made me think of tidy seed trays and careful routines.
I liked sliding names around when pots were shuffled and watching condensation frame the letters at dawn. The magnetic approach kept things tidy and moved easily, offering a light, modular rhythm to pots on shelves and windowsills, where labels could follow seedlings from tray to pot without fuss.
Steps
- Gather flat magnetic sheets, weatherproof markers, and scissors suitable for cutting magnetic material.
- Cut rectangles or shapes and write plant names or dates with a durable marker.
- Allow ink to dry fully, then place magnets on greenhouse glass or metal shelving near the corresponding pots.
- Move magnets as plants are relocated or grouped for easy reorganization.
Driftwood name stakes with salt-worn character

Pieces of driftwood bring a weathered seaside memory and a tactile, sun-bleached grain that feels like a small found relic. Each twig or plank carries little nicks and curves from tides, making every label unique.
I enjoyed choosing a piece whose curve matched a plant bed and painting a gentle name along its length so the letters followed the wood’s flow. Their pale, bleached faces looked soft in afternoon light, and when wind stirred the bed the driftwood added a serene, coastal cadence to the garden’s chorus.
Steps
- Collect suitable driftwood pieces, a fine weatherproof pen or pigment, and short metal or wooden stakes.
- Clean driftwood and let it dry completely to ensure stable marking.
- Add plant names or small icons following the wood’s natural curves and allow ink or pigment to set.
- Fix driftwood pieces to stakes or press ends into soil so names remain visible.