There’s something quietly comforting about making snowflakes from paper on a chilly afternoon. I still remember a rainy weekend where a pile of scrap paper, a kettle steaming on the stove, and a playlist of soft songs turned a living room into a small workshop of delicate shapes.
Cozy Winter Snowflake Paper Crafts became my way of marking time between sips of cocoa and the slow fall of dusk.
These paper projects are less about perfection and more about the hush of careful moments. Each snowflake carries a little memory — a sunbeam caught through a tiny cut, the soft crinkle of tissue, the shadow theatre on a frosty window — and Cozy Winter Snowflake Paper Crafts invite quiet, tactile joy.
Lacy paper snowflakes for a vintage mantel

I love how thin paper captures sunlight, turning tiny cutouts into lace that seems almost alive on a mantel. The soft edges catch shadows, giving the whole display a gentle movement even when everything is still.
Old book pages and cream stationery lend a warm, lived-in tone, and the faint scent of paper feels like a small comfort. When these snowflakes are clustered together, the patterns overlap and create a layered look that feels both nostalgic and cozy.
The overall effect is quietly charming, like afternoon light on a familiar shelf.
Steps
- Choose a square of lighter-weight paper and crease the diagonals and midlines to create reference folds.
- Trim the outer shape into a rounded wedge and make symmetric small incisions along the edges for a lace-like silhouette.
- Open the paper slowly to reveal the central motif, and flatten gently under a heavy book for a soft, even finish.
Three-dimensional star snowflakes that float

There’s a small delight in plucking a paper star from a pile and seeing it hold its shape in the air. These three-dimensional snowflakes have little pockets of shadow and highlight that change with the slightest draft.
I remember hanging one near a window and watching it spin slowly, catching the light like a tiny mobile. The play between crisp silhouettes and rounded volumes creates a sense of depth that feels surprisingly sculptural.
When several hang together, they form a constellation of soft geometry that warms a chilly corner.
Steps
- Prepare multiple identical pointed modules from medium-weight paper, each shaped like a narrow diamond with a small tab.
- Interlock the tabs of the modules around a central point, aligning tips so the pieces form a symmetrical star.
- Gently fan the arms outward to create volume and balance, then suspend with thin thread from the ceiling or a branch.
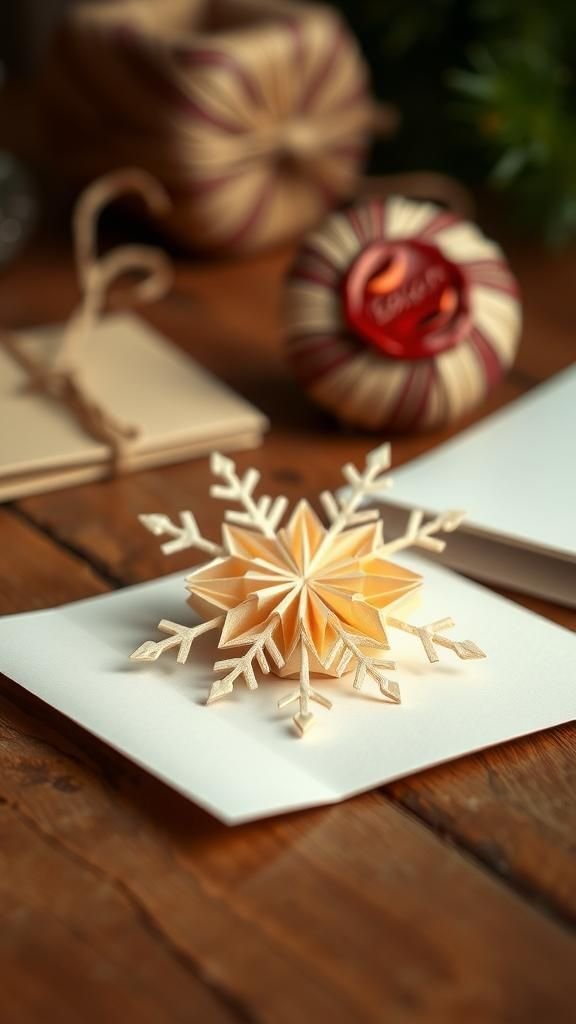
Origami-inspired snowflake with folded geometry

The crisp planes of origami bring a quiet precision to a winter table. This snowflake feels like a small architectural piece, with clean lines that catch light in interesting ways.
I often leave one on the corner of a windowsill where morning light sharpens the edges and the whole shape reads like a tiny paper sculpture. The tactile satisfaction comes from the smooth, even creases and the way angles meet to form a delicate star.
That measured geometry sits nicely beside softer decorations, offering a calm counterpoint to fluffier textures.
Steps
- Start with a perfect square of thin paper and crease repeatedly along preplanned diagonals to form a star grid.
- Collapse the paper along those creases into a compact base, revealing intersecting triangular planes.
- Refine the tips and open selected sections to reveal the snowflake’s star pattern, then flatten lightly against a smooth surface.
Soft tissue snowflakes with whisper-thin layers

Tissue paper snowflakes seem almost ephemeral, like dried petals held together by air. The layers are translucent, and when light filters through the edges they glow with soft color.
I made a bunch one evening and the table looked like a painter’s palette, delicate hues overlapping to form new shades. The tactile quality is fragile yet forgiving, offering a gentle crunch when touched and an airy lightness when suspended.
These snowflakes drift in a way that feels playful and gentle, perfect for stringing above a reading nook or bed.
Steps
- Stack several sheets of tissue in matching sizes and crease into a compact fan to create layered translucency.
- Round the outer edges and snip shallow motifs along the folds to form repeating patterns.
- Separate the layers gently and fluff each tier to achieve a cloud-like, multi-dimensional snowflake.
Doily snowflakes that feel heirloom-made

Paper doilies bring an heirloom softness to winter decorations, their tiny holes and scalloped edges evoking afternoons at a grandparent’s kitchen. When grouped on a string, they create a delicate garland that catches light in a playful way.
I like the faint embossing and the way the patterns repeat, each center forming a tiny floral star. There’s a warm domesticity to them, a reminder of slow afternoons and small rituals.
Doilies balance sweetness with a hint of formality, making them suited to both casual corners and more dressed-up mantelpieces.
Steps
- Select an assortment of paper doilies in complementary sizes and shades to create layered interest.
- Overlap edges along a length of thread or thin ribbon, spacing to allow gentle movement between pieces.
- Anchor the ends and drape the garland across a mantel, doorway, or over a cozy chair for a soft vintage touch.
Window cling snowflakes in translucent vellum

Translucent vellum snowflakes look like captured bits of frost on a pane. When sunlight passes through, colors soften into a watercolor wash that feels very calm.
I remember cutting a set and pressing them to the glass, then pausing to watch the shifting light during the afternoon. The smooth, slightly glossy surface makes each motif read like a miniature stained-glass piece.
Their clarity frames outdoor views with a wintery edge, and they give a neat, tidy appearance that complements both modern and homey interiors.
Steps
- Trace snowflake designs onto thin vellum and perforate around motifs to create delicate negative spaces.
- Moisten the adhesive backing lightly and place each piece against a clean window to achieve a smooth bond.
- Smooth from center outward to minimize bubbles and arrange a constellation of clings at varying heights.
Papercut silhouettes for cozy mantle shadows
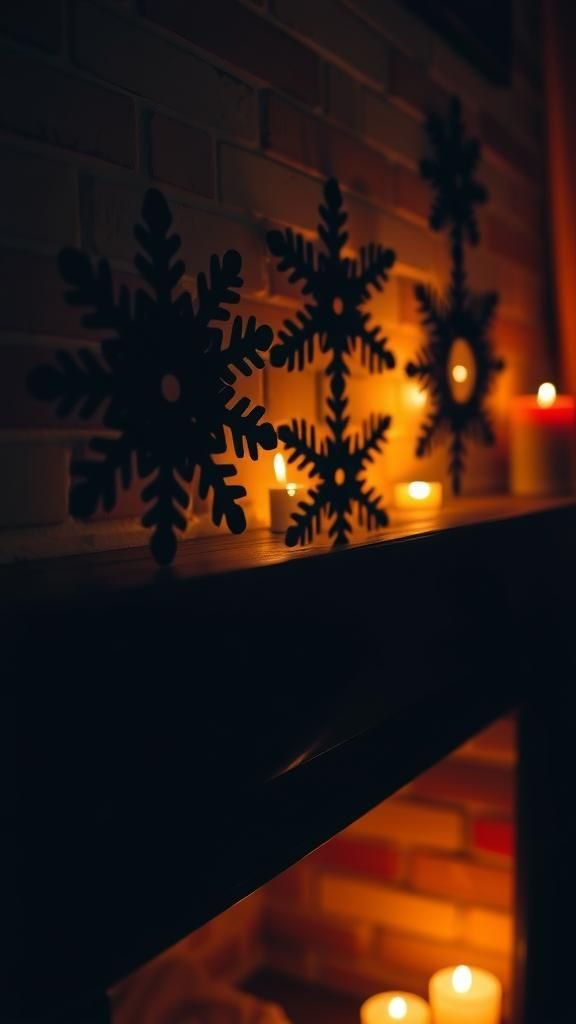
Silhouette papercuts create a dramatic, graphic mood against a warmly lit wall. I like arranging them so their shadows stretch long across the fireplace bricks as evening settles.
Black or dark-toned paper brings a bold contrast to lighter surroundings, while the negative space of each snowflake becomes the visual star. The interplay of light and shadow feels theatrical but still intimate; it’s like a small shadow play that keeps the room feeling lived in.
These silhouettes often invite conversation, because each one reads differently as the light shifts.
Steps
- Choose a high-contrast sheet and sketch a symmetrical snowflake motif to guide the cutwork.
- Perforate the outline carefully and remove inner sections to reveal the negative shapes.
- Mount the finished silhouettes on a light background or attach near a warm lamp to showcase the shadow patterns.
Kirigami pop-up snowflakes for greeting cards
There’s a quiet delight when a card opens to reveal a tiny structural snowflake popping into view. The dimensionality feels like a little surprise tucked between lines of handwriting.
I keep a small stack of these cards for slow winter correspondence; the recipient often mentions the tactile reveal and how the paper architecture unfolds into a little winter scene. The central pop-up sometimes throws delicate shadows across the card base, adding to the sense of depth.
It’s a small way to make a note feel like a keepsake rather than a quick message.
Steps
- Fold the card base in half and mark the central axis to guide symmetric pop-up elements.
- Create matching kirigami tabs on the inner panel and shape the snowflake motif to sit proud of the base.
- Test the pop-up action by closing and opening gently, adjusting the angles for a smooth reveal.
Quilled snowflakes with tiny rolled details

Quilling adds a sweet, miniature texture that feels like embroidery in paper. Each tight coil and elongated teardrop contributes a little bead of shadow that shimmers when light hits the edges.
I find the rhythm of rolling strips soothing, and the finished pieces have a jewel-like presence on a wreath or card. The raised coils catch dust motes and feel pleasantly tactile beneath fingertips.
When grouped, these snowflakes seem like small constellations, each coil functioning as a star that contributes to the whole composition.
Steps
- Prepare narrow strips of paper and roll them into tight coils, pinching select coils into teardrop and marquise shapes.
- Arrange the rolled elements symmetrically around a central ring to build the snowflake’s arms.
- Secure the pieces together on a backing sheet with tiny dabs of liquid adhesive and allow to set before display.
Minimalist geometric snowflakes in cool hues
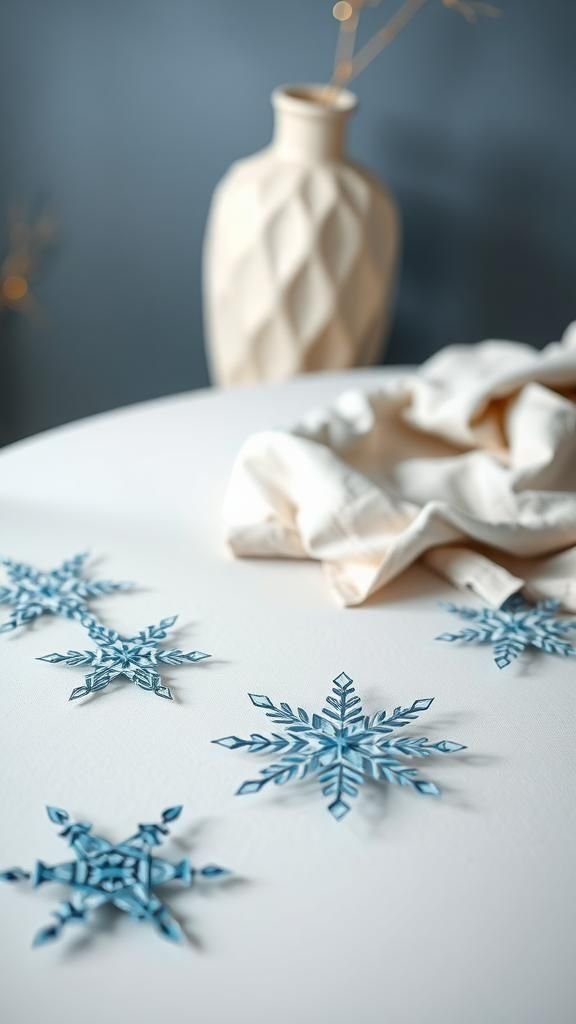
Minimal geometry brings a calm modernity to winter decor. Clean negative spaces and restrained lines feel deliberate and composed on a bedside table or windowsill.
I often pair these with matte ceramic vases and muted textiles to keep the scene serene rather than busy. The cool palette of icy blues and silvery grays enhances the feeling of a quiet, reflective afternoon.
There’s an elegance in the restraint here, where each line and empty space earns attention and the whole arrangement reads as a studied, peaceful composition.
Steps
- Sketch a simple radial design on heavyweight paper, focusing on clean straight lines and balanced negative spaces.
- Remove sections to create a crisp geometric pattern and smooth the edges for a neat finish.
- Mount the finished piece on a pale backing to emphasize the cool hues and place within a calm vignette.
Rustic bark-and-paper snowflakes for cabin charm

Combining thin paper with bits of bark brings a woodland touch that feels wonderfully rustic. The rough texture of bark contrasts with the smoothness of paper, and the scent of wood evokes a cabin evening.
I made a handful of these and loved how they sat against a dark pine wreath, their irregular edges lending a homespun, comfortable look. The natural imperfections make each one feel handcrafted and friendly, as though the forest itself had helped decorate a living room for the holidays.
Steps
- Select slim sheets of paper and small flat bark pieces that harmonize in tone and texture.
- Layer paper motifs over bark elements, aligning centers to maintain the snowflake silhouette.
- Fasten the layers together at the center point and arrange the finished pieces onto a rustic wreath or display.
Metallic-edged snowflakes for subtle winter sparkle

A fine metallic edge catches light without shouting, adding a whisper of shine to a cluster of paper snowflakes. The thin gleam along each contour reads like frost kissed by a soft lamp.
I often reach for metallic pens late at night, tracing edges while a podcast murmurs in the background. The tactile feel is slightly raised, and the shimmer plays beautifully with shadow, creating small highlights that shift as the viewing angle changes.
The effect is refined and quietly festive, a little nod to celebration without being flashy.
Steps
- Create or select a snowflake silhouette on smooth paper and prepare a fine-tipped metallic marker.
- Trace the outer edges and inner motifs carefully to introduce subtle reflective accents.
- Allow the ink to dry fully and display where gentle light will catch the metallic highlights.
Layered cardstock snowflakes with bold silhouettes
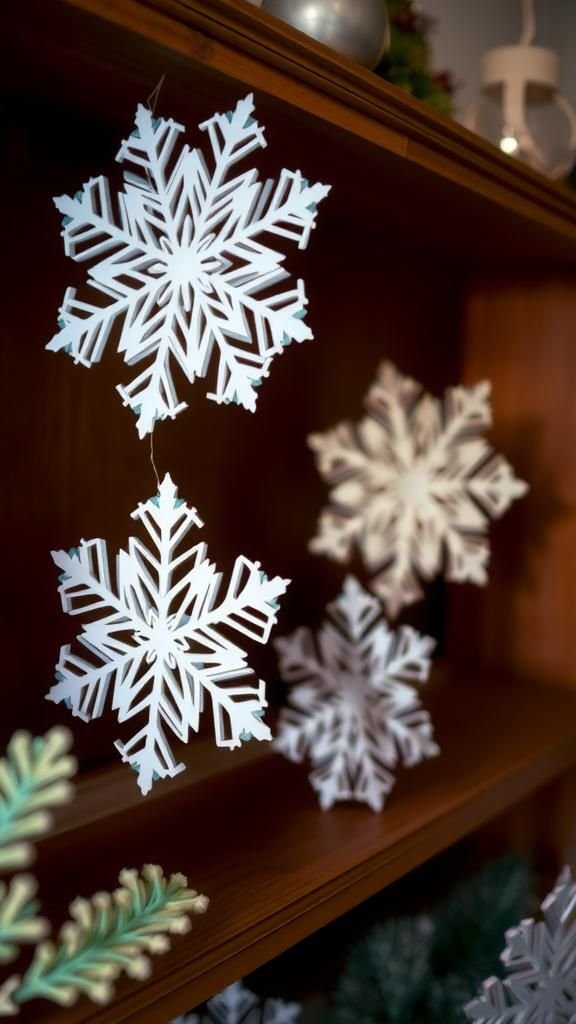
Stacking cardstock sheets creates a bold, sculptural snowflake that feels sturdy and confident on a shelf. The edges read cleanly from across a room, and subtle color shifts between layers add depth.
I like to combine a darker core with lighter outer layers to create a halo effect where shadows nestle between tiers. The weight of cardstock gives a satisfying presence, and the finished shapes hold up well near a hearth or hallway where they might brush against other decorations.
The result feels strong yet inviting, a nice balance for winter decor.
Steps
- Cut identical snowflake shapes from two or three shades of cardstock to create layered contrast.
- Stack the layers precisely, aligning centers to maintain symmetry across the silhouette.
- Secure the layers at the center and allow the edges to float slightly to reveal the tiered effect.
Tea-stained antique snowflakes with faded charm

Tea-staining paper lends an antique warmth that feels like an old keepsake pulled from a drawer. The mottled browns and soft tea rings add character, making each snowflake read like a small found object.
I enjoy the slowness of the effect, leaving pieces to dry and watching the light alter their tones throughout the day. These snowflakes have a gentle, storied look, as if they carry memories of colder seasons past.
Arranged with brass accents and woolen textiles, they create a welcoming, lived-in winter tableau.
Steps
- Immerse thin paper in a diluted tea bath to achieve a subtle aged patina, then dry fully on a flat surface.
- Create snowflake motifs once the paper is stable, favoring softer, rounded cutouts to complement the old-paper look.
- Arrange the finished pieces among vintage objects for a warm, nostalgic display.
Pressed-leaf snowflake hybrids for nature nods

Incorporating pressed leaves into paper snowflakes brings a fresh connection to the outdoors. The organic veins and delicate colors of leaves add an unexpected, living quality to the static paper form.
I like collecting small specimens during walks and imagining how their shapes will nestle into a snowflake design. The combination reads as both botanical and wintry, a quiet celebration of seasonal contrast.
Displayed near a window, the leaves catch light differently than paper, offering a small, changing vignette as their hues mellow over time.
Steps
- Press thin leaves until flat and stable, then plan their placement within a paper snowflake motif.
- Layer leaves and paper elements thoughtfully, aligning veins and contours to complement the overall shape.
- Seal the layered assembly between two clear sheets for protection and hang near a window to enjoy the translucency.
Stenciled snowflake patterns on kraft paper

Stenciling brings a hand-printed warmth to kraft paper, with soft edges and subtle texture from the ink. I often reach for muted inks and a foam pad, layering motifs in slightly offset positions to create a gentle rhythm across a gift tag or a card.
The rustic brown of kraft grounds the cool snowflake shapes, producing a restrained, homespun charm. There’s a satisfying graininess to the printed edges that feels artisan, like the marks of a careful maker.
These pieces pair nicely with twine and recycled materials for a wholesome winter expression.
Steps
- Position a snowflake stencil over kraft paper and dab ink with a soft pad to achieve even coverage.
- Reposition the stencil slightly to create a layered, printed rhythm across the surface.
- Allow the ink to dry fully and pair the panels with simple natural embellishments for a grounded presentation.
Embossed paper snowflakes with raised detail

Embossing gives snowflakes a sculpted quality that feels refined and tactile. The raised ridges catch light differently, creating a play of shadow and highlight that reads as quite elegant.
I enjoy running my fingers along the gentle relief, which adds a sensory dimension beyond sight. Placed on a shelf or used as a card front, embossed snowflakes bring a quiet luxury that feels measured and thoughtful.
The technique works beautifully with soft, neutral papers where the subtle textures can truly shine without overwhelming the surrounding decor.
Steps
- Trace a snowflake design onto a heavier sheet and position a soft mat beneath to allow for clear relief.
- Use a rounded tool to rub along the drawn lines from the back side, creating raised contours.
- Highlight the raised areas lightly with a soft dry pigment to enhance the dimensional effect and display as desired.
Snowflake lanterns that glow on winter nights

Paper lanterns with snowflake cutouts transform a small lamp into a winter scene, casting patterned light across nearby walls. The warm glow that spills through the motifs feels like a gentle hearth when nights are long.
I recall an evening when a single lantern made a hallway feel less empty, the moving shadows offering a soothing rhythm. The combination of warmth and pattern invites a slow pace, encouraging quiet reading or soft conversation.
These lanterns provide comfort without fuss, giving light a poetic pattern for the season.
Steps
- Prepare a cylindrical paper shade with carefully arranged snowflake cutouts to allow patterned light to escape.
- Position the shade around a low-heat light source or LED to ensure safe illumination.
- Place the lantern on a table or hang it at a height where the cast patterns can dance across nearby surfaces.
Confetti snowflake streamers for playful windows

Tiny snowflake confetti strung into streamers feels playful and lighthearted, fluttering with the faintest breeze. The scatter of small shapes creates a dotted rhythm against glass that reads as joyful and festive.
I once strung a collection across a child’s window and loved how the pieces moved in response to window drafts, creating a soft, animated scene. The effect is lively without being noisy, lending a casual, celebratory air to a room.
Colors can be coordinated to match a palette or mixed for a cheerful patchwork of winter motifs.
Steps
- Punch a series of small snowflake shapes from lightweight paper in a range of complementary colors.
- Thread the confetti onto fine string at loose intervals to allow motion between pieces.
- Hang the streamers vertically in a window to capture drafts and create a playful fluttering display.
Patchwork snowflakes from mixed paper scraps

Patchwork snowflakes assembled from scrap paper bring an eclectic charm that feels resourceful and warm. Mismatched patterns and textures create a collage effect, where each fragment contributes its own story.
I like the happy accidents that occur when a floral scrap meets a plain cream square, producing a motif with a surprised twist. These pieces read as joyful and casual, great for brightening a kitchen or hallway.
The variety of papers yields a lively visual rhythm, and there’s a satisfying sense of making something new out of what was on hand.
Steps
- Collect an assortment of small paper scraps with differing patterns and weights to build visual interest.
- Layer and interlock the fragments around a central axis to form a radial patchwork silhouette.
- Finish by smoothing edges and placing the snowflake on a contrasting backing to highlight the collage effect.
Paper doormat snowflakes for entryway delight
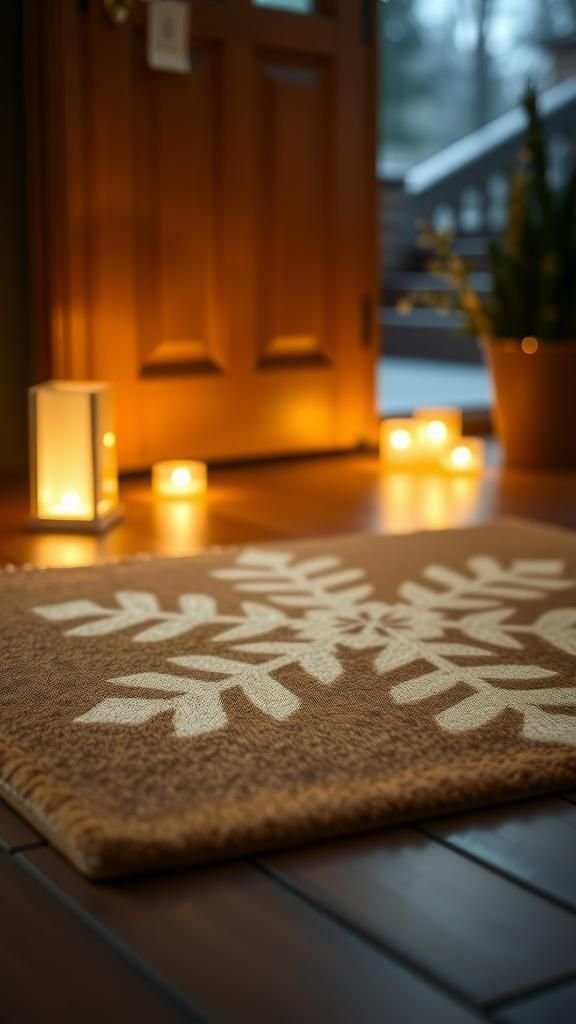
Oversized snowflakes on a paper mat create a welcoming, whimsical note at the threshold. The large scale feels bold but friendly, announcing winter’s arrival with a playful wink.
I once made a trio for a small foyer and enjoyed how guests smiled at the hand-drawn motifs as they stepped inside. The tactile paper surface contrasts nicely with harder floors, and the graphic silhouettes read well in dim hall light.
Arranged in a small cluster, they make the entry feel intentionally seasonal without requiring major overhaul of decor.
Steps
- Cut large snowflake silhouettes from heavyweight paper sized to suit the entry space.
- Arrange the pieces on a protective base and secure the edges lightly to prevent shifting.
- Place the mat near the door and refresh occasionally to keep the display looking neat.